Rota Service
The Rota Service provides a comprehensive shift scheduling and workforce planning solution, allowing managers to create professional work rotas that can be saved, printed, or shared as PDF documents. This service integrates with the Employee Management Service, pulling from existing employee profiles to create schedules.
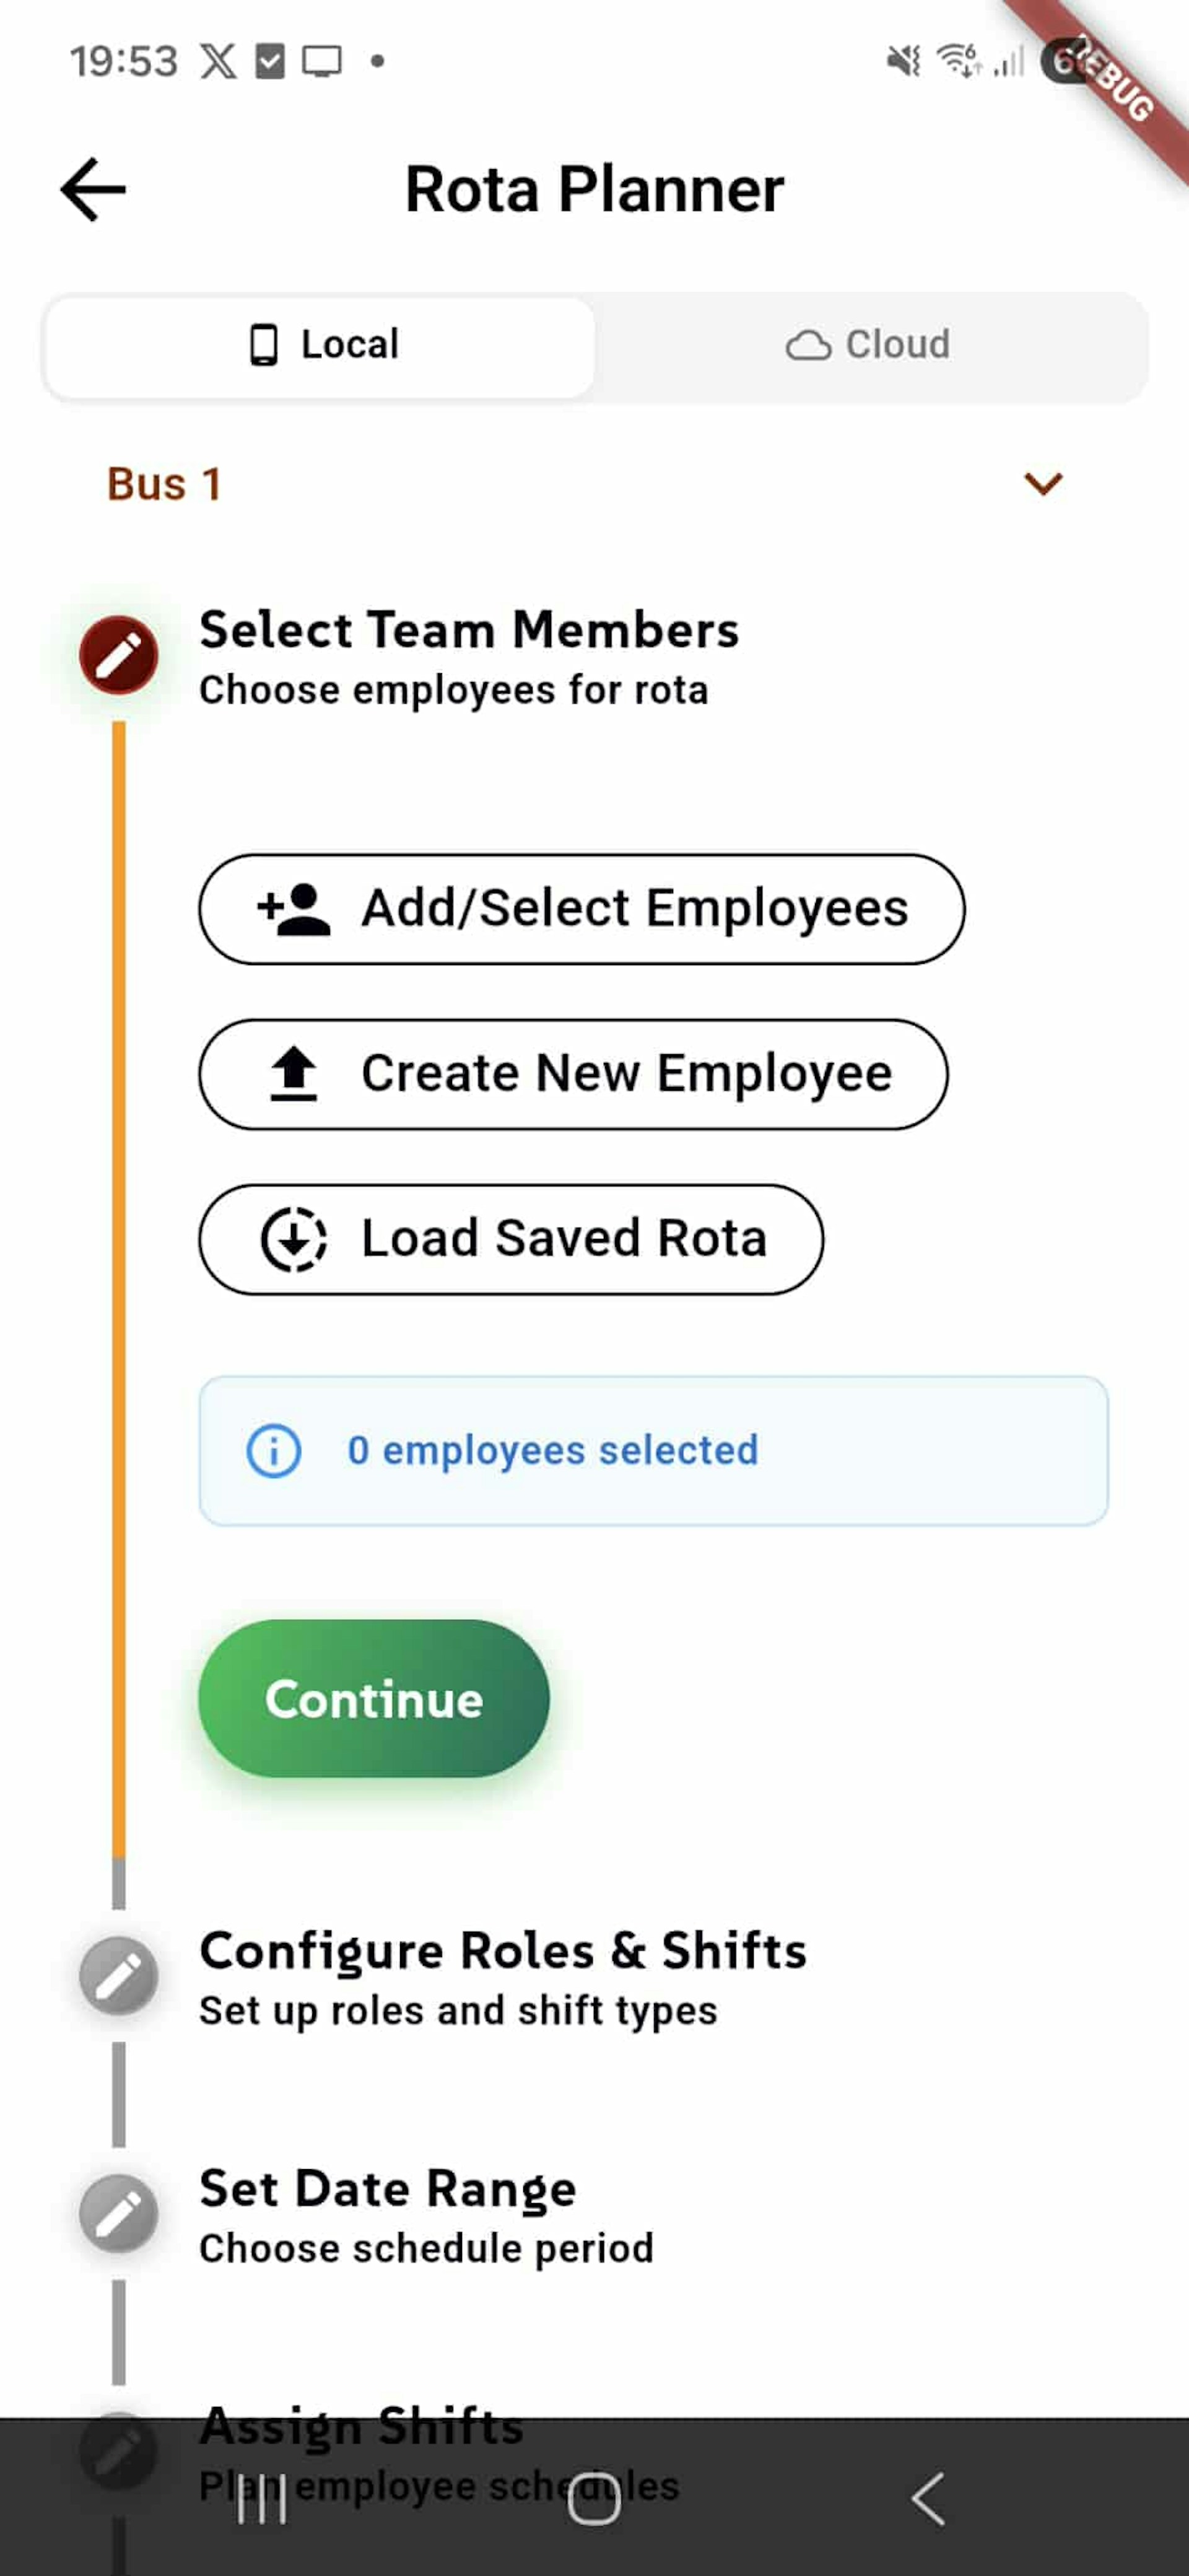
The rota creation process follows a 5-step workflow designed to make shift planning quick and efficient. In Step 1: Select Team Members, users begin by choosing which employees will be included in the rota schedule.
The screen displays the selected business (e.g., "Bus 1") via a dropdown selector, with data available both locally and in the cloud. The main section shows three action buttons:
- "Add/Select Employees" opens a picker to choose from existing employees in the Employee Management Service
- "Create New Employee" allows quick creation of new employee profiles without leaving the rota workflow
- "Load Saved Rota" enables users to open previously created schedules as templates or for editing
An information indicator shows "0 employees selected" in blue, updating in real-time as team members are added. The green "Continue" button becomes active once at least one employee is selected, allowing progression to the next step.
Below, grayed-out steps preview the remaining workflow: Configure Roles & Shifts (Step 2), Set Date Range (Step 3), followed by shift assignment and finalization steps. The vertical progress line visually connects all steps, showing the user's position in the creation process.
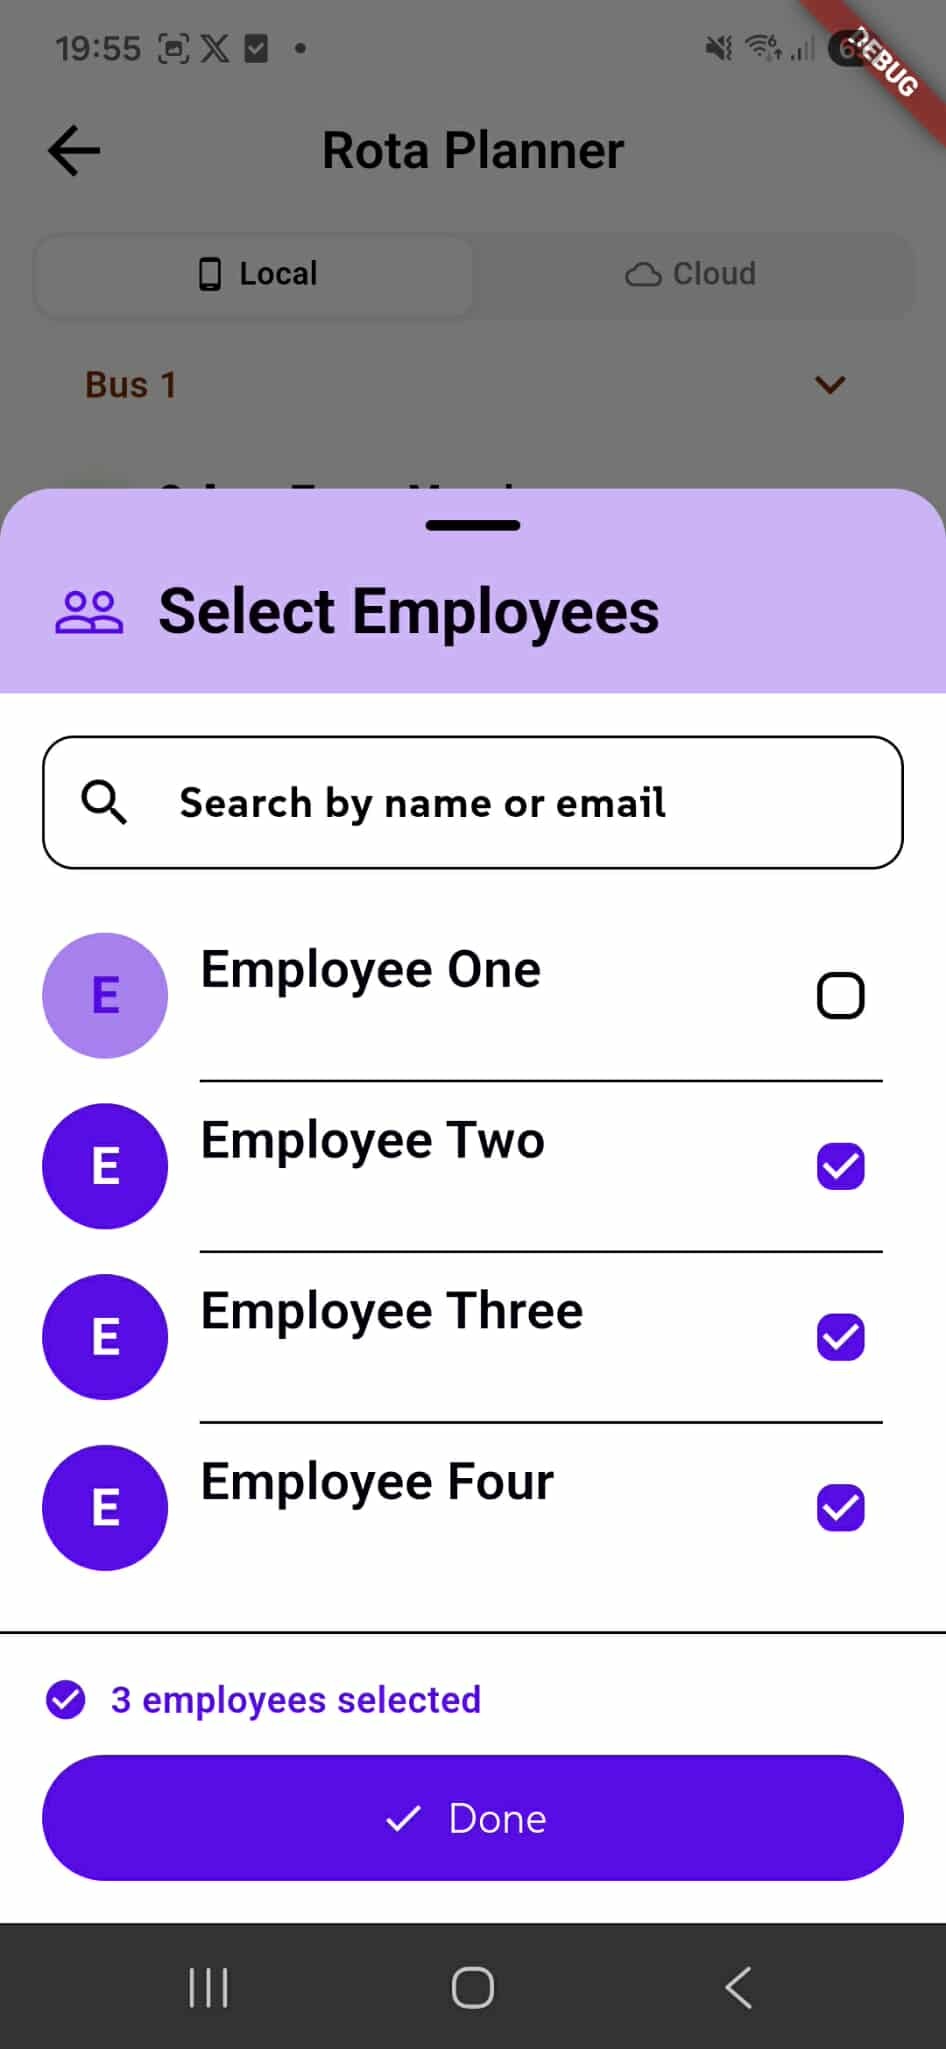
Employee Selection Modal
When clicking "Add/Select Employees" in Step 1, a modal dialog appears displaying all available employees from the Employee Management Service. This "Select Employees" modal features a clean, purple-themed interface for easy team member selection.
The "Search by name or email" field at the top allows users to quickly filter through large employee lists, making it easy to find specific team members when managing many employees across multiple businesses.
Each employee is displayed as a row with their colored avatar and name (e.g., "Employee One", "Employee Two", "Employee Three", "Employee Four"). A checkbox on the right side of each row allows for multi-select functionality - users can select as many employees as needed for the rota.
In this example, 3 out of 4 employees are selected, as indicated by the purple checkmarks next to "Employee Two", "Employee Three", and "Employee Four", while "Employee One" remains unselected. The selection counter at the bottom displays "3 employees selected" with a purple checkmark icon, providing clear feedback on the current selection.
Once satisfied with their selection, users tap the prominent purple "Done" button to confirm their choices and return to the main rota creation screen, where the employee count will update accordingly, enabling the "Continue" button to proceed to Step 2.
Load Saved Rotas
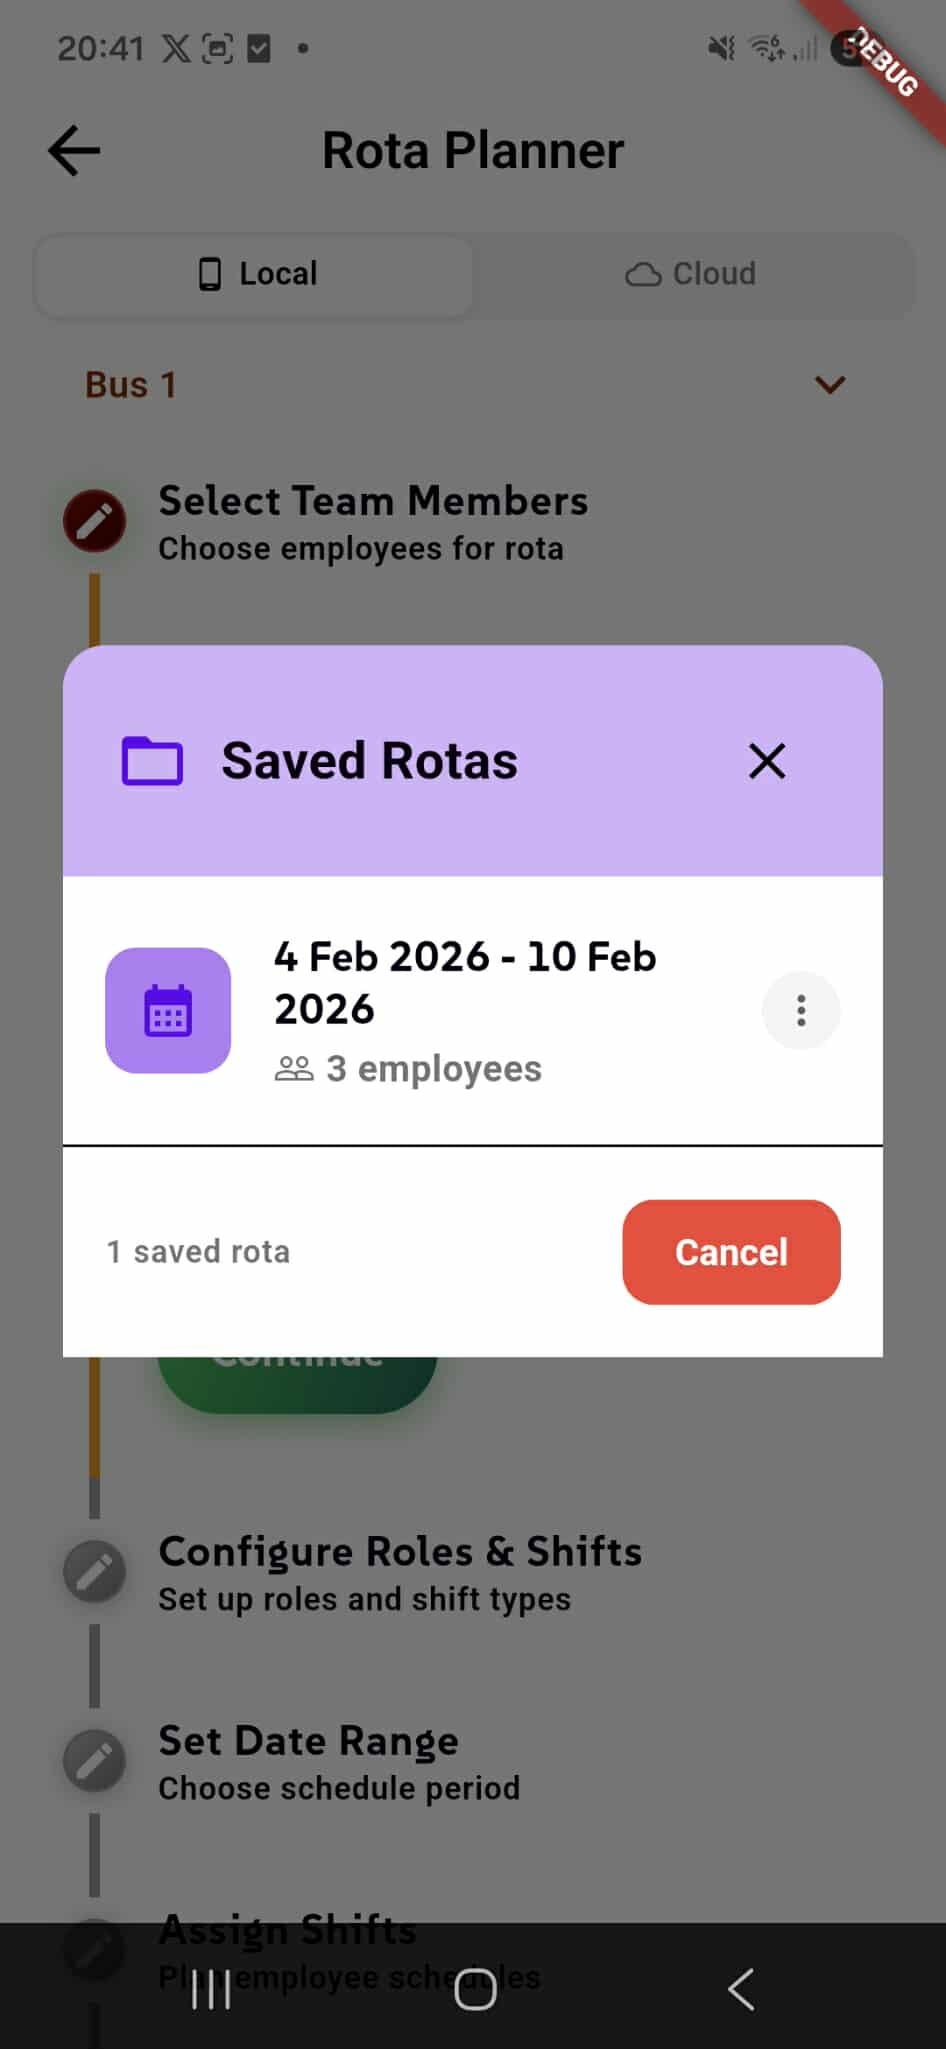
In Step 1, users have the option to load previously created rotas as templates or for editing, saving time when creating similar schedules. Clicking "Load Saved Rota" opens the "Saved Rotas" modal dialog.
The modal displays a list of previously saved rota schedules as cards, each showing key information:
- Date range of the rota (e.g., "4 Feb 2026 - 10 Feb 2026")
- Calendar icon for visual identification
- Employee count (e.g., "3 employees") showing how many team members were included
- Three-dot menu for additional options like editing or deleting
At the bottom, a counter shows the total number of saved rotas (e.g., "1 saved rota"), helping users keep track of their stored schedules. The red "Cancel" button dismisses the modal and returns to the main rota creation screen.
Selecting a saved rota pre-populates all the configuration from that schedule, including:
- Selected employees
- Configured roles and shifts
- Date range
- Shift assignments
This feature is particularly useful for recurring schedules (weekly patterns, seasonal rotations) or when creating similar rotas for different time periods. Users can load a template and make minor adjustments rather than starting from scratch each time.

Configure Roles & Shifts
In Step 2: Configure Roles & Shifts, users define the different job roles and shift patterns that will be used throughout the rota schedule. This step is now active, indicated by the checkmark on the completed first step.
The main action is accessed via the "Manage Roles & Shifts" button, which opens a configuration interface for creating and managing:
- Roles - Job positions or responsibilities (e.g., Manager, Server, Chef, Cashier)
- Shifts - Time periods and shift types (e.g., Morning 9-5, Evening 5-11, Night Shift)
Two status indicators provide real-time feedback:
- "0 roles configured" (orange info icon) - Shows how many job roles have been created
- "0 shifts configured" (green info icon) - Displays the number of shift patterns defined
The green "Continue" button allows progression to Step 3 once at least one role and one shift have been configured, while the red "Back" button returns to the previous step.
Below, the remaining steps are previewed: Set Date Range (Step 3), Assign Shifts (Step 4), and Review & Complete (Step 5), connected by the vertical progress line.
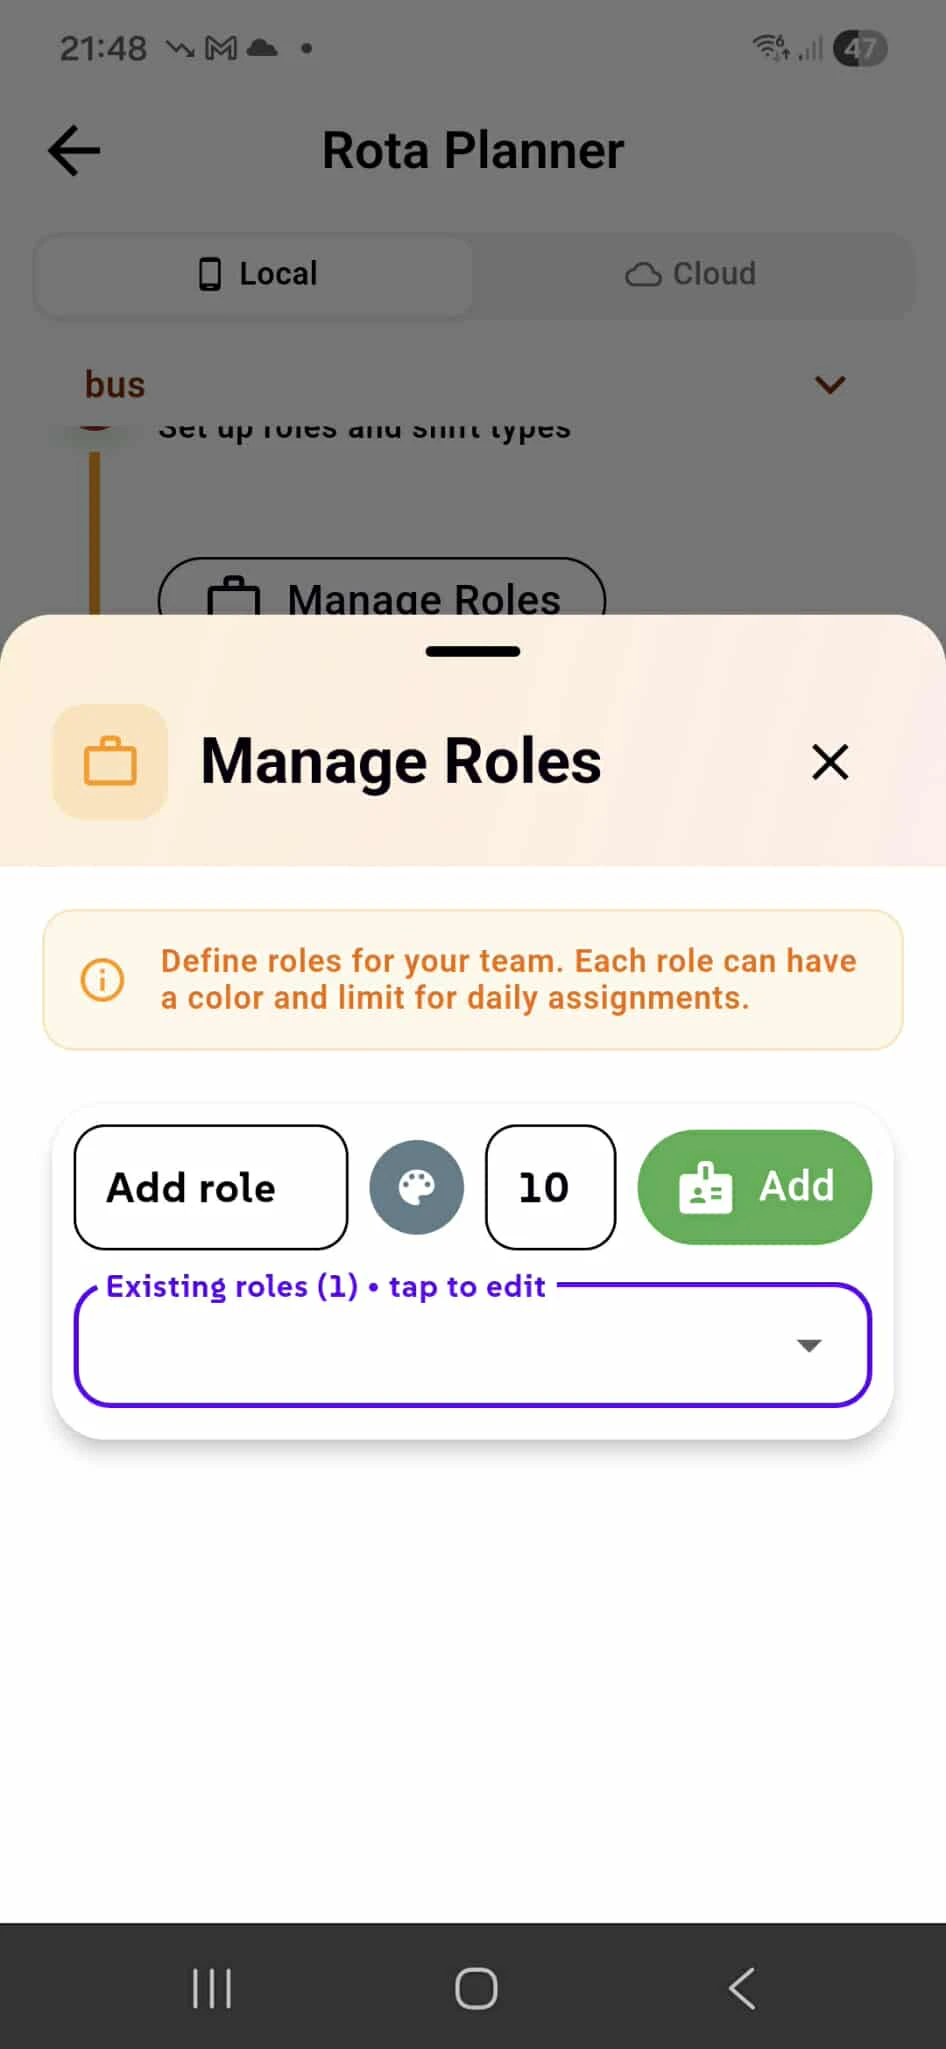
Manage Roles
The top section of the "Roles & Shifts" modal allows users to create and manage job roles that will be assigned to employees in the rota schedule.
Users can add new roles via the "Add role" text input field, typing the role name (e.g., "Manager", "Server", "Chef"). Next to the input, a color picker (represented by a blue circle icon) allows users to assign a unique color to each role for easy visual identification throughout the rota. The number badge displays "5", indicating how many roles currently exist.
Once the role name and color are selected, the purple "Add" button saves the new role to the system. Created roles appear as a list below with their assigned colors and capacity limits:
- "ABL" (orange indicator) - "Limit: 2"
- "Ground" (blue indicator) - "Limit: 5"
The "Limit" value indicates the maximum number of employees who can be assigned to that role simultaneously, helping managers control staffing levels and prevent over-scheduling in specific positions. Each role can be edited or deleted after creation, providing flexible workforce planning.
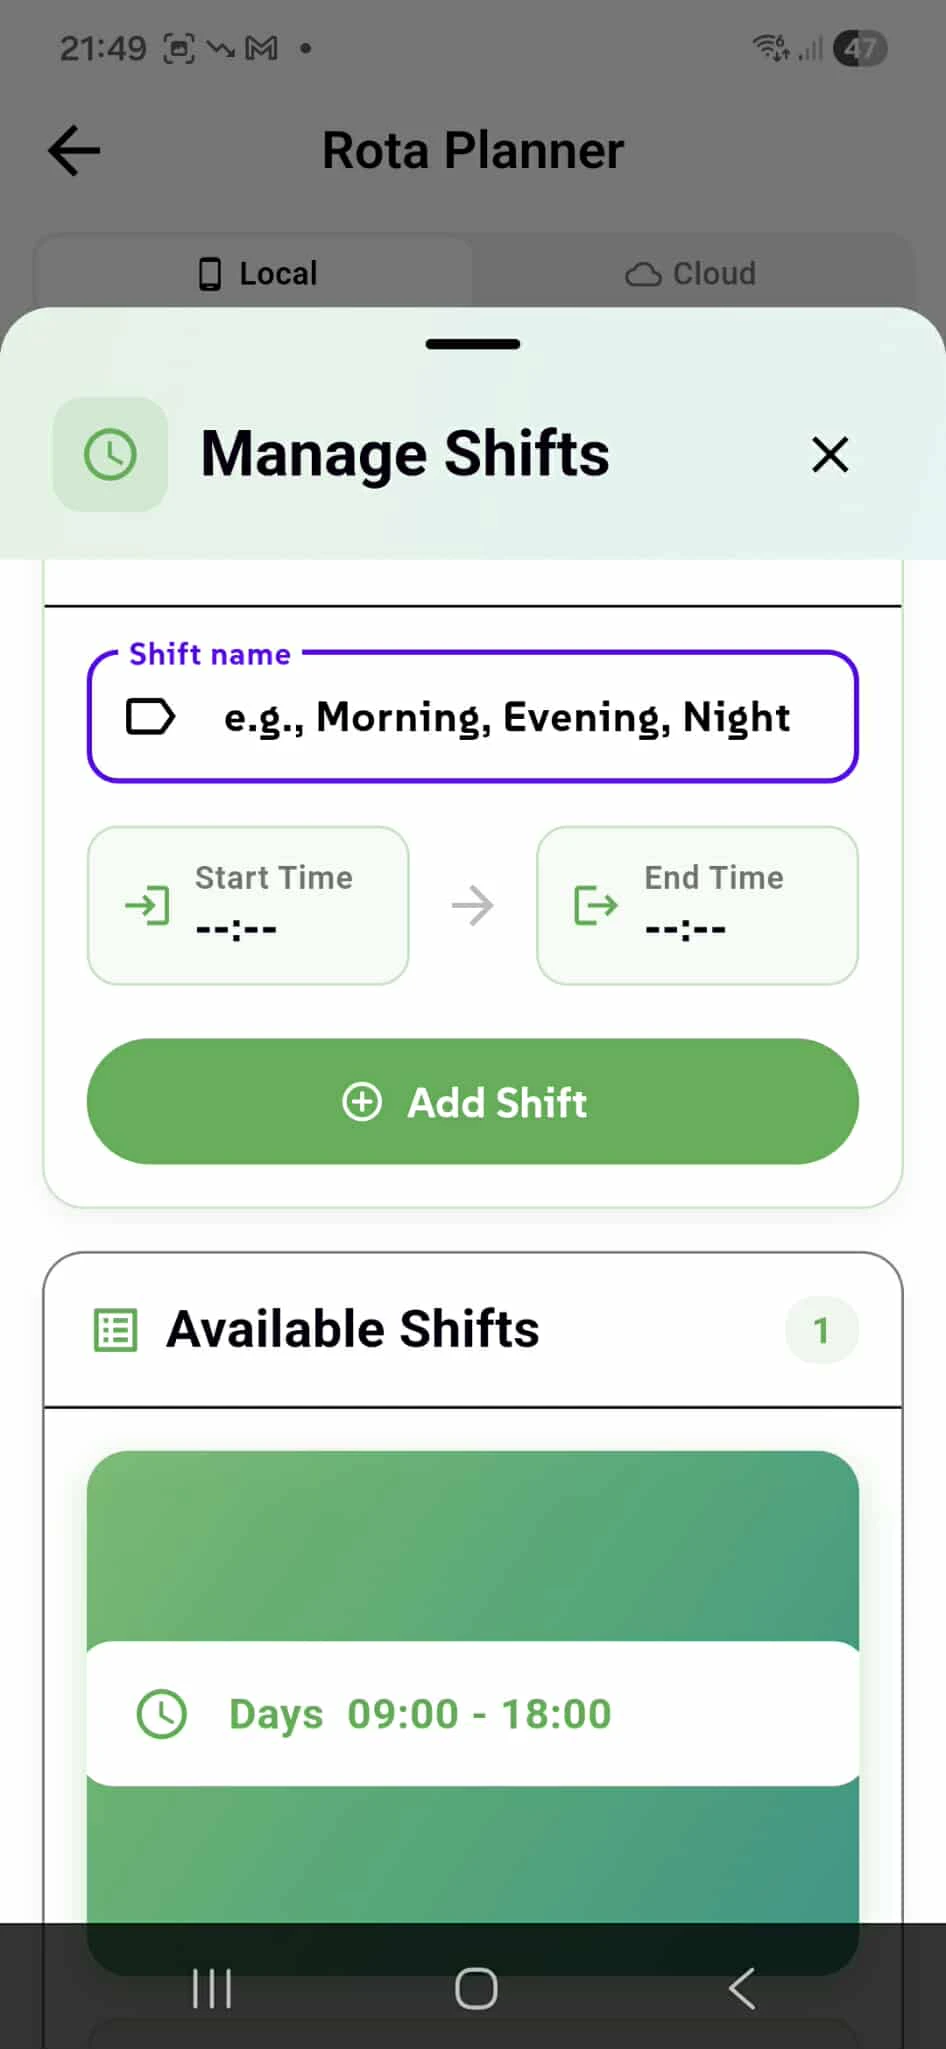
Manage Shifts
The "Shifts" section of the modal enables users to define the different time periods and shift patterns used in their scheduling system.
The "Create New Shift" form includes three essential fields:
- "Shift name" text input for labeling the shift (e.g., "Morning Shift", "Evening Shift", "Night Shift", "Split Shift")
- "Start Time" picker (currently showing "--:--") for setting when the shift begins
- "End Time" picker (currently showing "--:--") for setting when the shift ends
An arrow icon between the time pickers visually represents the time span from start to end. Once all fields are completed, the prominent purple "Add Shift" button creates and saves the shift configuration.
Below the creation form, the "Available Shifts" section displays all previously configured shifts as a scrollable list. Users can tap on existing shifts to edit their details or remove them if they're no longer needed. These shift templates can then be assigned to specific employees on specific days during the scheduling process in Step 4.
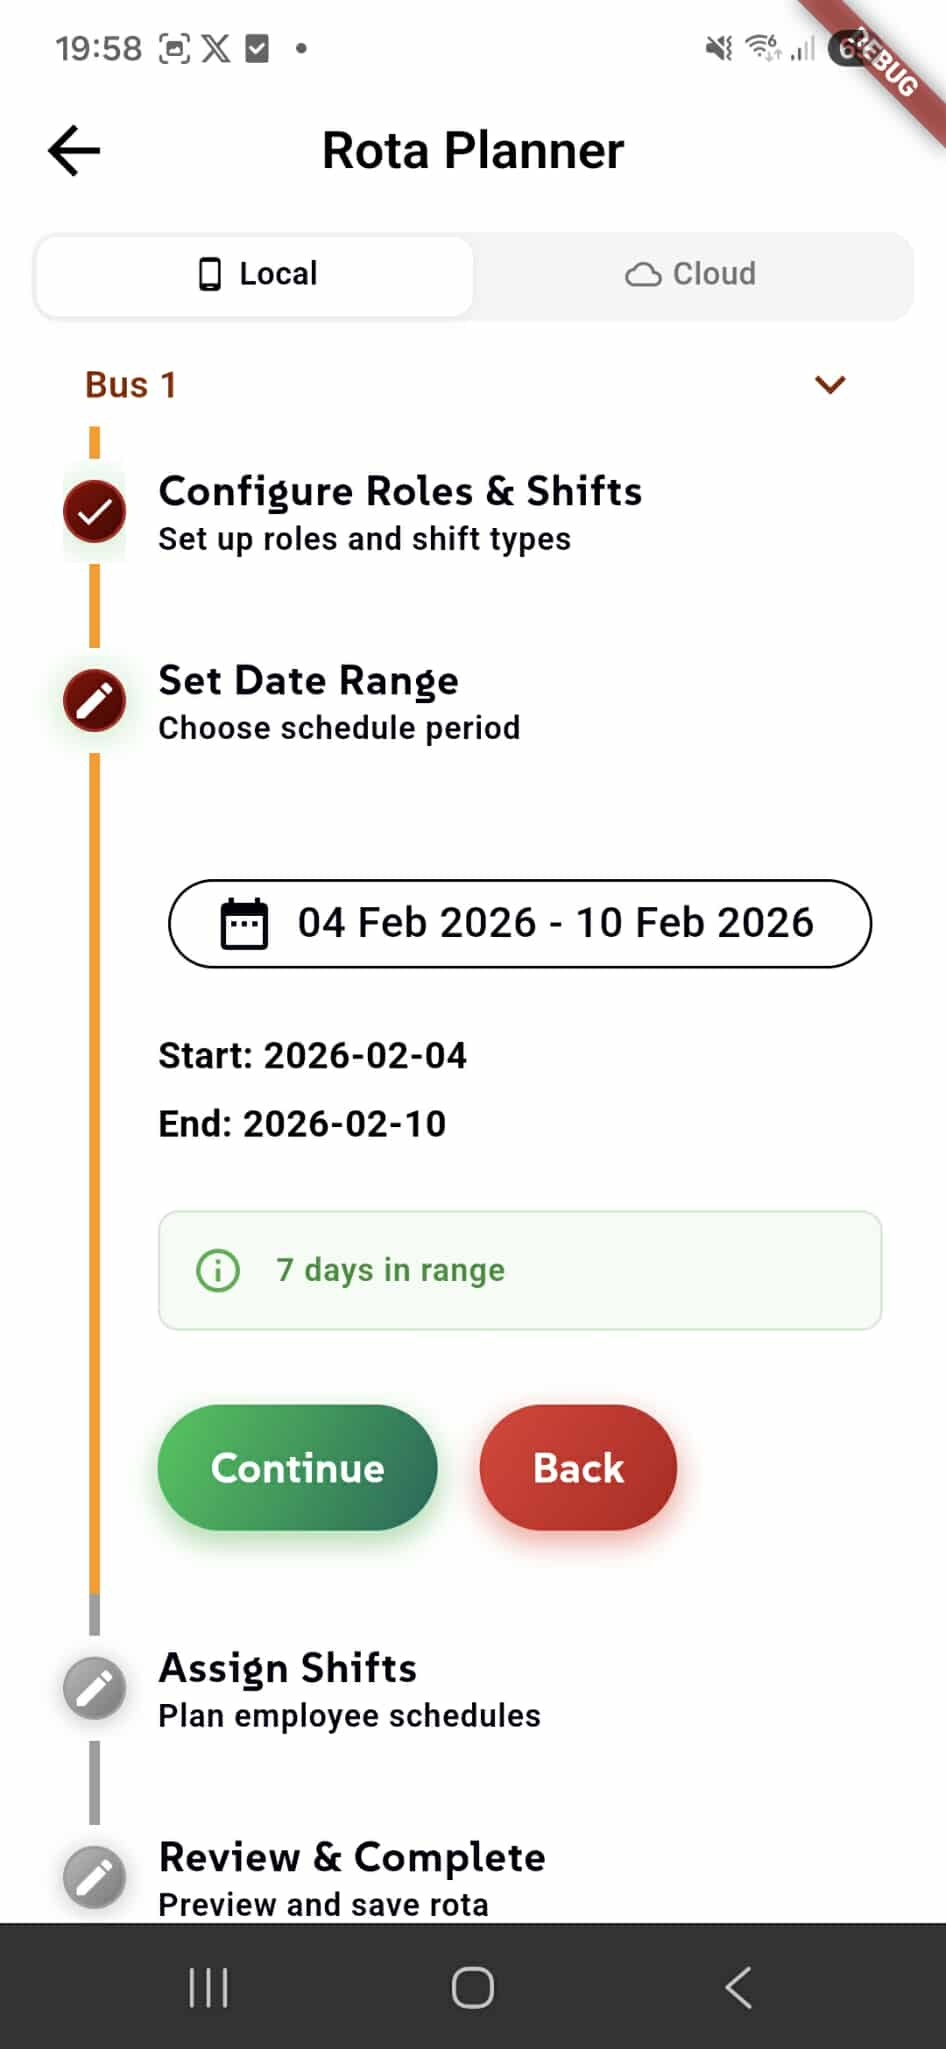
Set Date Range
In Step 3: Set Date Range, users define the scheduling period for the rota by selecting start and end dates.
The date range picker button displays the currently selected period (e.g., "04 Feb 2026 - 10 Feb 2026") with a calendar icon. Tapping this button opens a date picker for easy selection of custom date ranges.
Below, the dates are shown in detail:
- Start: 2026-02-04
- End: 2026-02-10
A green info badge displays "7 days in range", automatically calculating the total number of days in the selected period. This helps managers quickly understand the scope of the schedule they're creating.
The green "Continue" button proceeds to Step 4 for shift assignments, while the red "Back" button returns to the previous step. The remaining steps (**Assign Shifts** and Review & Complete) are visible below in the progress tracker.
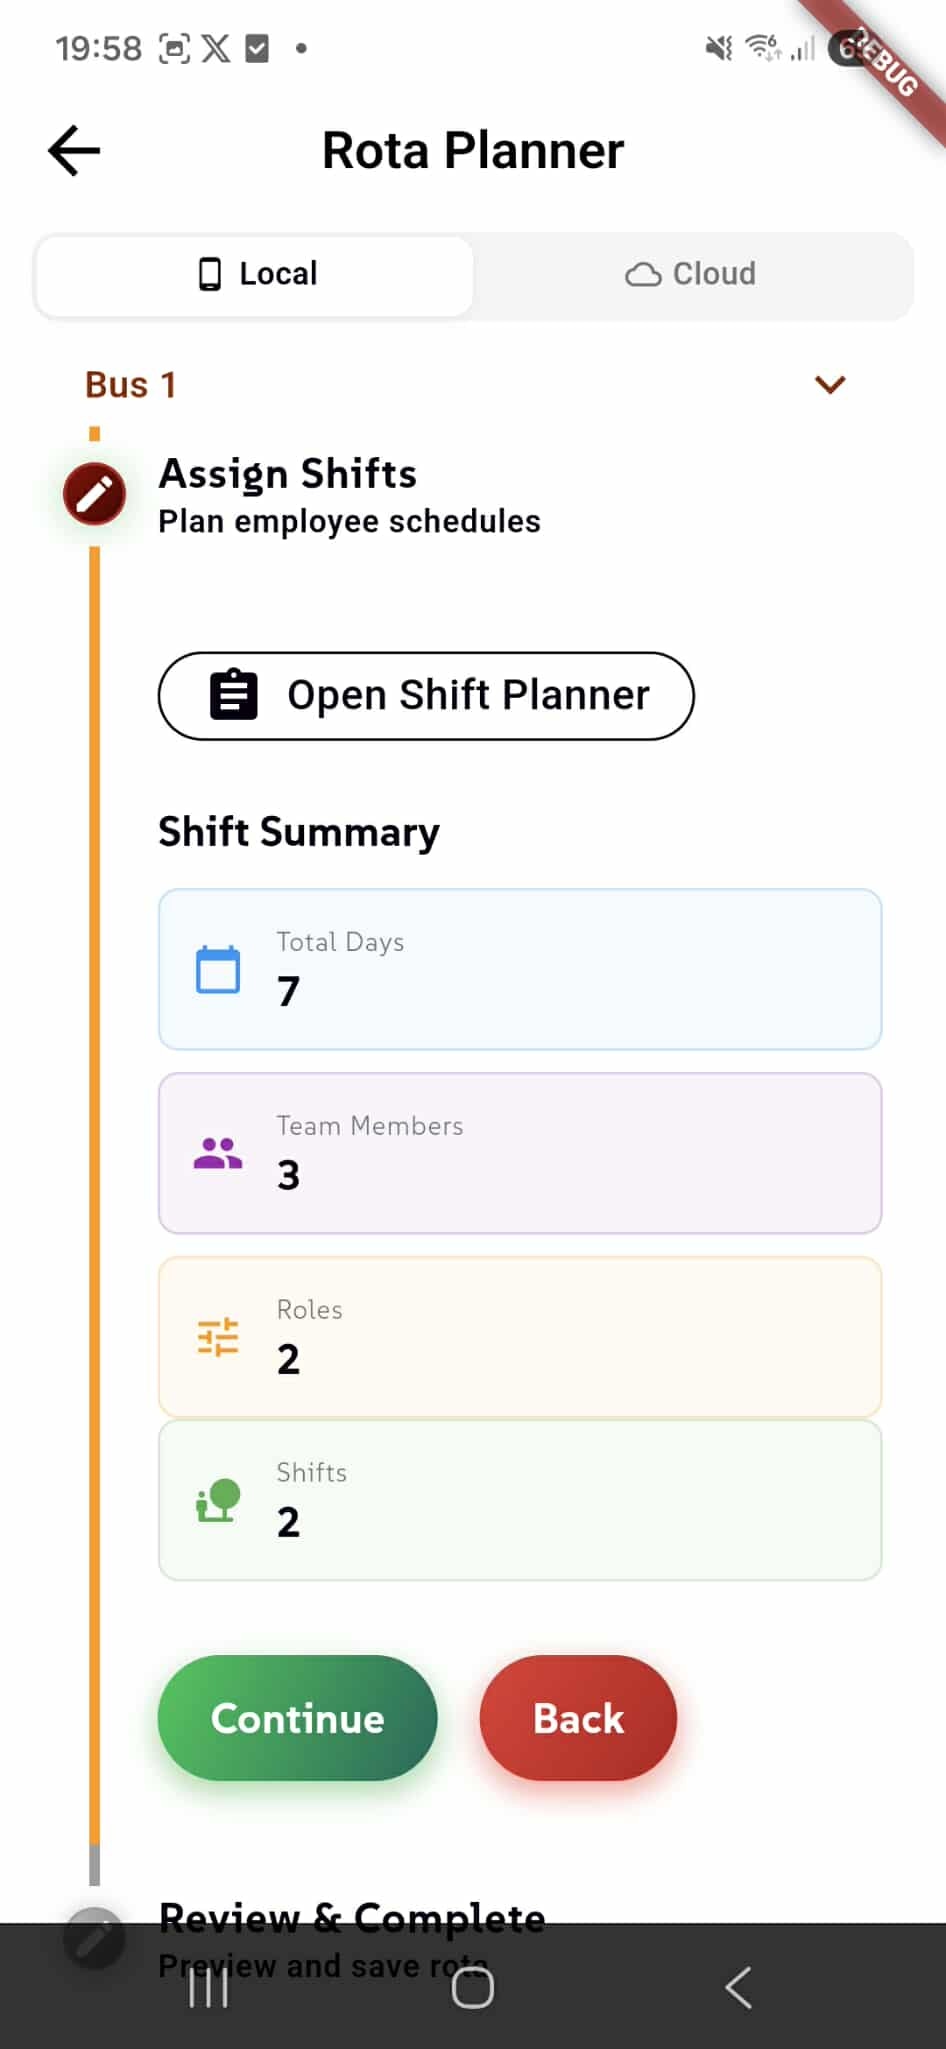
Assign Shifts to Employees
In Step 4: Assign Shifts, users assign specific roles and shift times to each employee for each day in the selected date range. This is where the actual schedule is built.
The "Open Shift Planner" button launches the interactive scheduling interface where managers can drag and drop or select shift assignments for each employee across all days in the rota period.
The "Shift Summary" section provides an overview of the rota configuration with four key statistics:
- Total Days: 7 - The number of days in the selected date range
- Team Members: 3 - How many employees are included in this rota
- Roles: 2 - The number of different job roles configured
- Shifts: 2 - The number of shift patterns available for assignment
This summary helps managers quickly verify their setup before proceeding to the actual shift assignments. The green "Continue" button advances to the final review step, while the red "Back" button returns to the date range selection. The final step, Review & Complete, is visible below in the progress tracker.
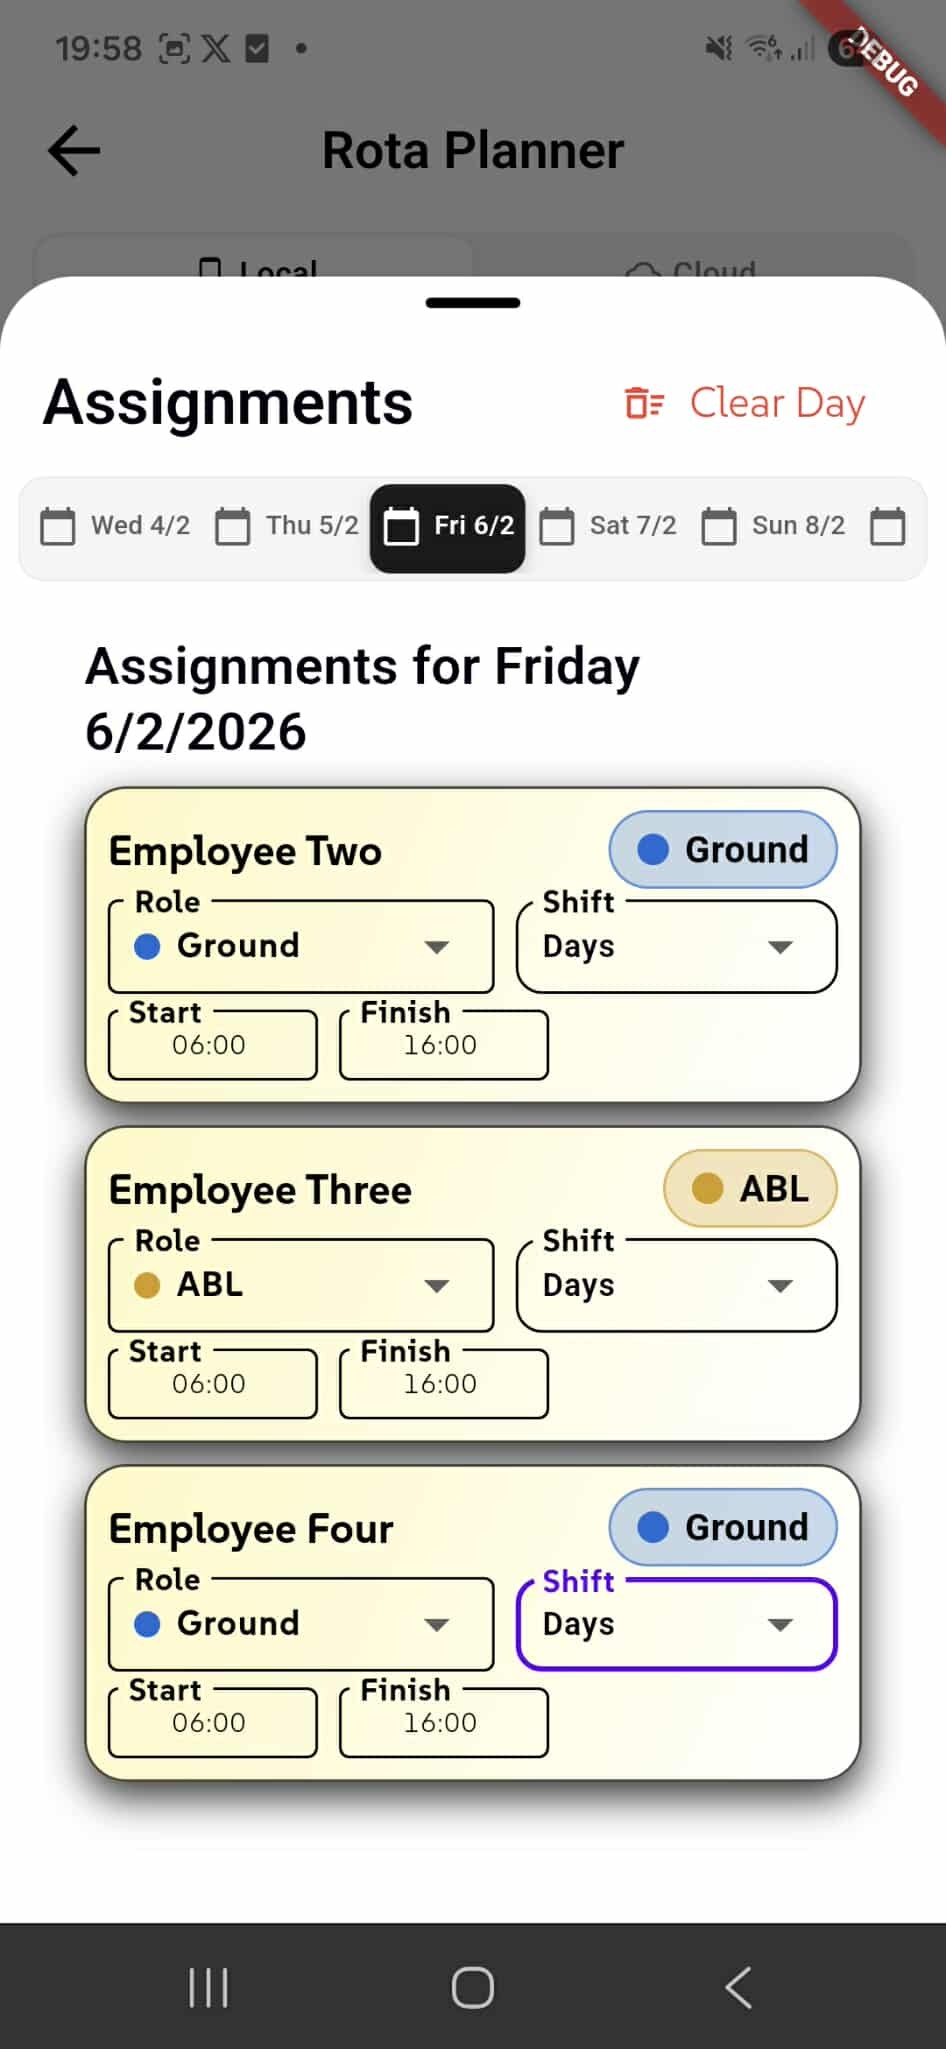
Daily Shift Assignment
Clicking "Open Shift Planner" reveals the interactive Assignments modal, where managers assign shifts to each employee for every day in the rota period.
The modal header shows "Assignments" with a "Clear Day" button in red, allowing managers to quickly remove all assignments for the current day if they need to start over.
A horizontal date navigation bar displays all days in the selected range (e.g., "Wed 4/2", "Thu 5/2", "Fri 6/2", "Sat 7/2", "Sun 8/2"), with the current day highlighted in black. Users can swipe or tap to switch between days, making it easy to plan week-long or multi-week schedules.
The main section shows "Assignments for Friday 6/2/2026" with individual assignment cards for each selected employee:
Employee Assignment Cards (displayed in a light yellow/beige background):
- Employee name at the top with their assigned role badge (e.g., "Ground" in blue, "ABL" in orange)
- Role dropdown to select from configured roles (e.g., "Ground", "ABL")
- Shift dropdown to choose the shift pattern (e.g., "Days")
- Start time field (e.g., "06:00")
- Finish time field (e.g., "16:00")
Each employee gets their own card, allowing managers to assign different roles, shifts, and custom times independently. This flexible system accommodates varying schedules, split shifts, and role rotations throughout the week.
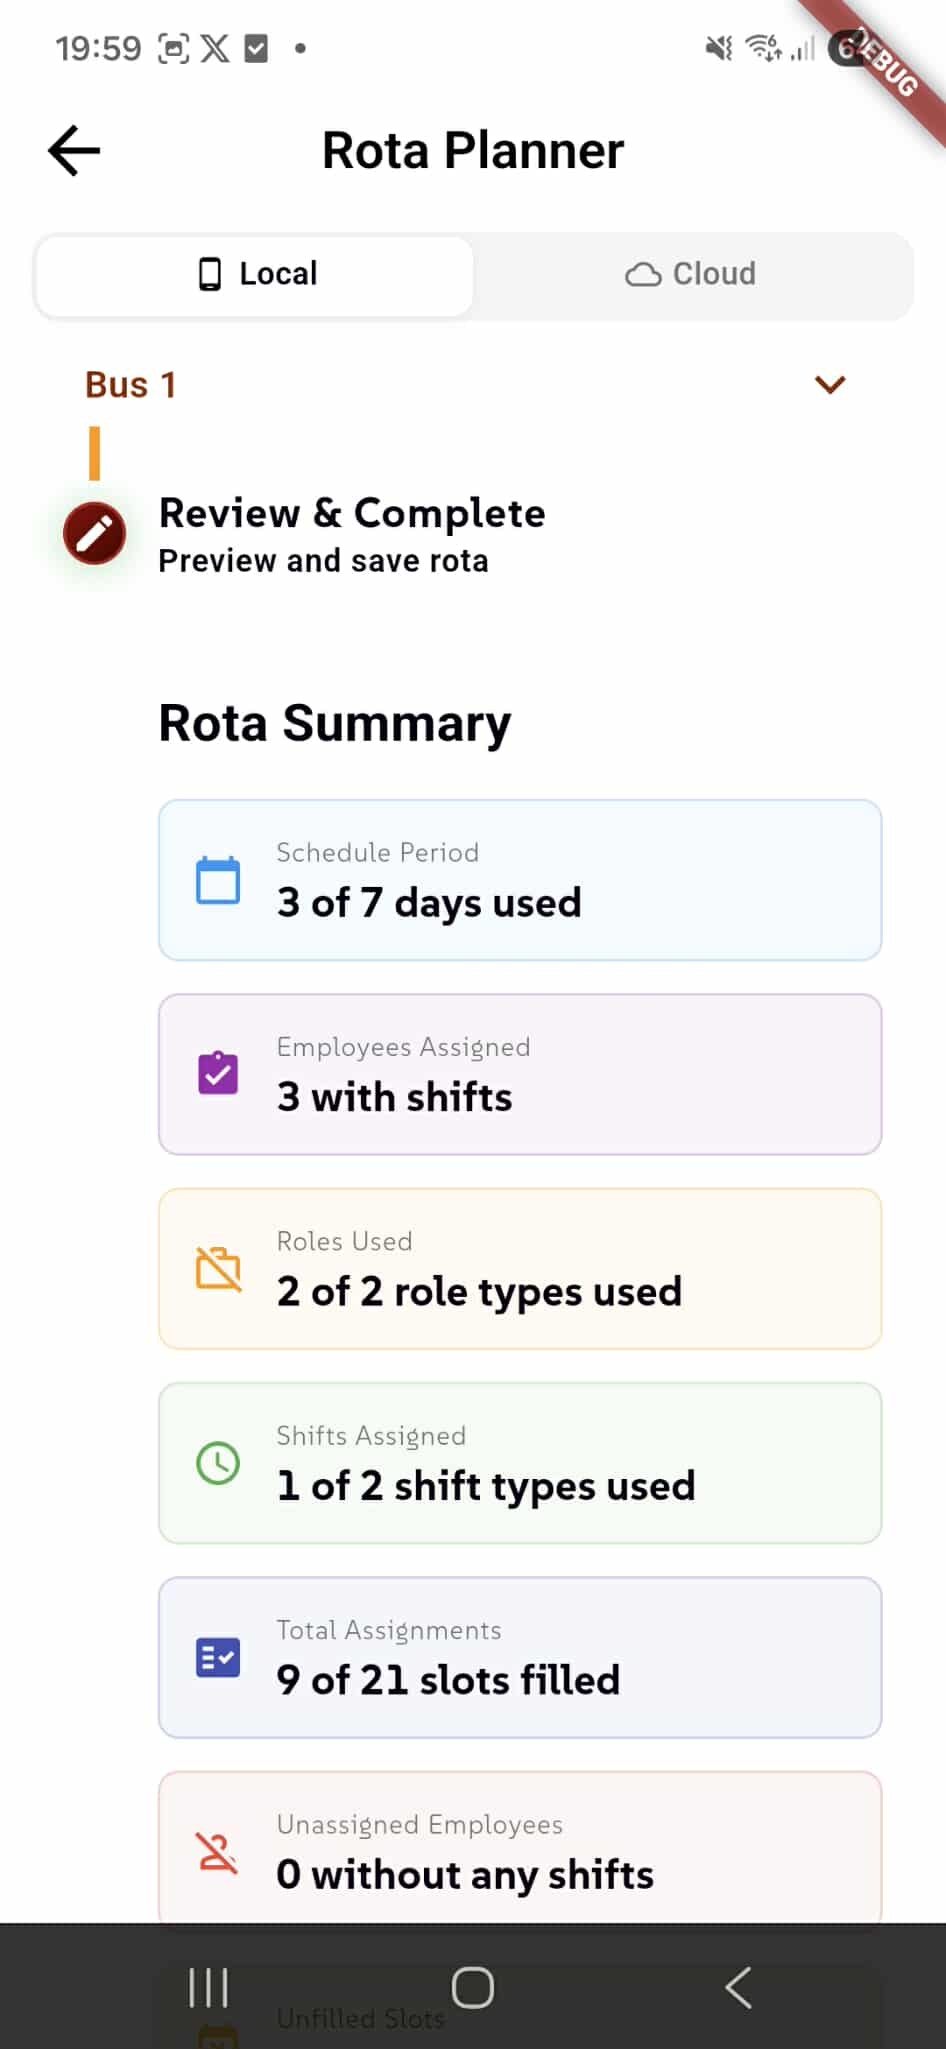
Review & Complete Rota
In the final step, Step 5: Review & Complete, users can review a comprehensive summary of the entire rota before generating the PDF document. This ensures all assignments are correct before finalizing.
The "Rota Summary" section displays six key statistics across color-coded cards:
- Schedule Period: 3 of 7 days used (blue) - Shows how many days in the date range have at least one shift assignment
- Employees Assigned: 3 with shifts (purple) - Number of employees who have been assigned at least one shift
- Roles Used: 2 of 2 role types used (orange) - How many configured roles are actively used in the schedule
- Shifts Assigned: 1 of 2 shift types used (green) - Which shift patterns have been assigned to employees
- Total Assignments: 9 of 21 slots filled (blue) - Total number of shift assignments vs. potential slots (employees × days)
- Unassigned Employees: 0 without any shifts (red) - Number of selected employees who haven't been given any shifts
This summary helps managers identify gaps in coverage, unused roles or shifts, and ensures all employees have appropriate assignments before proceeding to PDF generation.
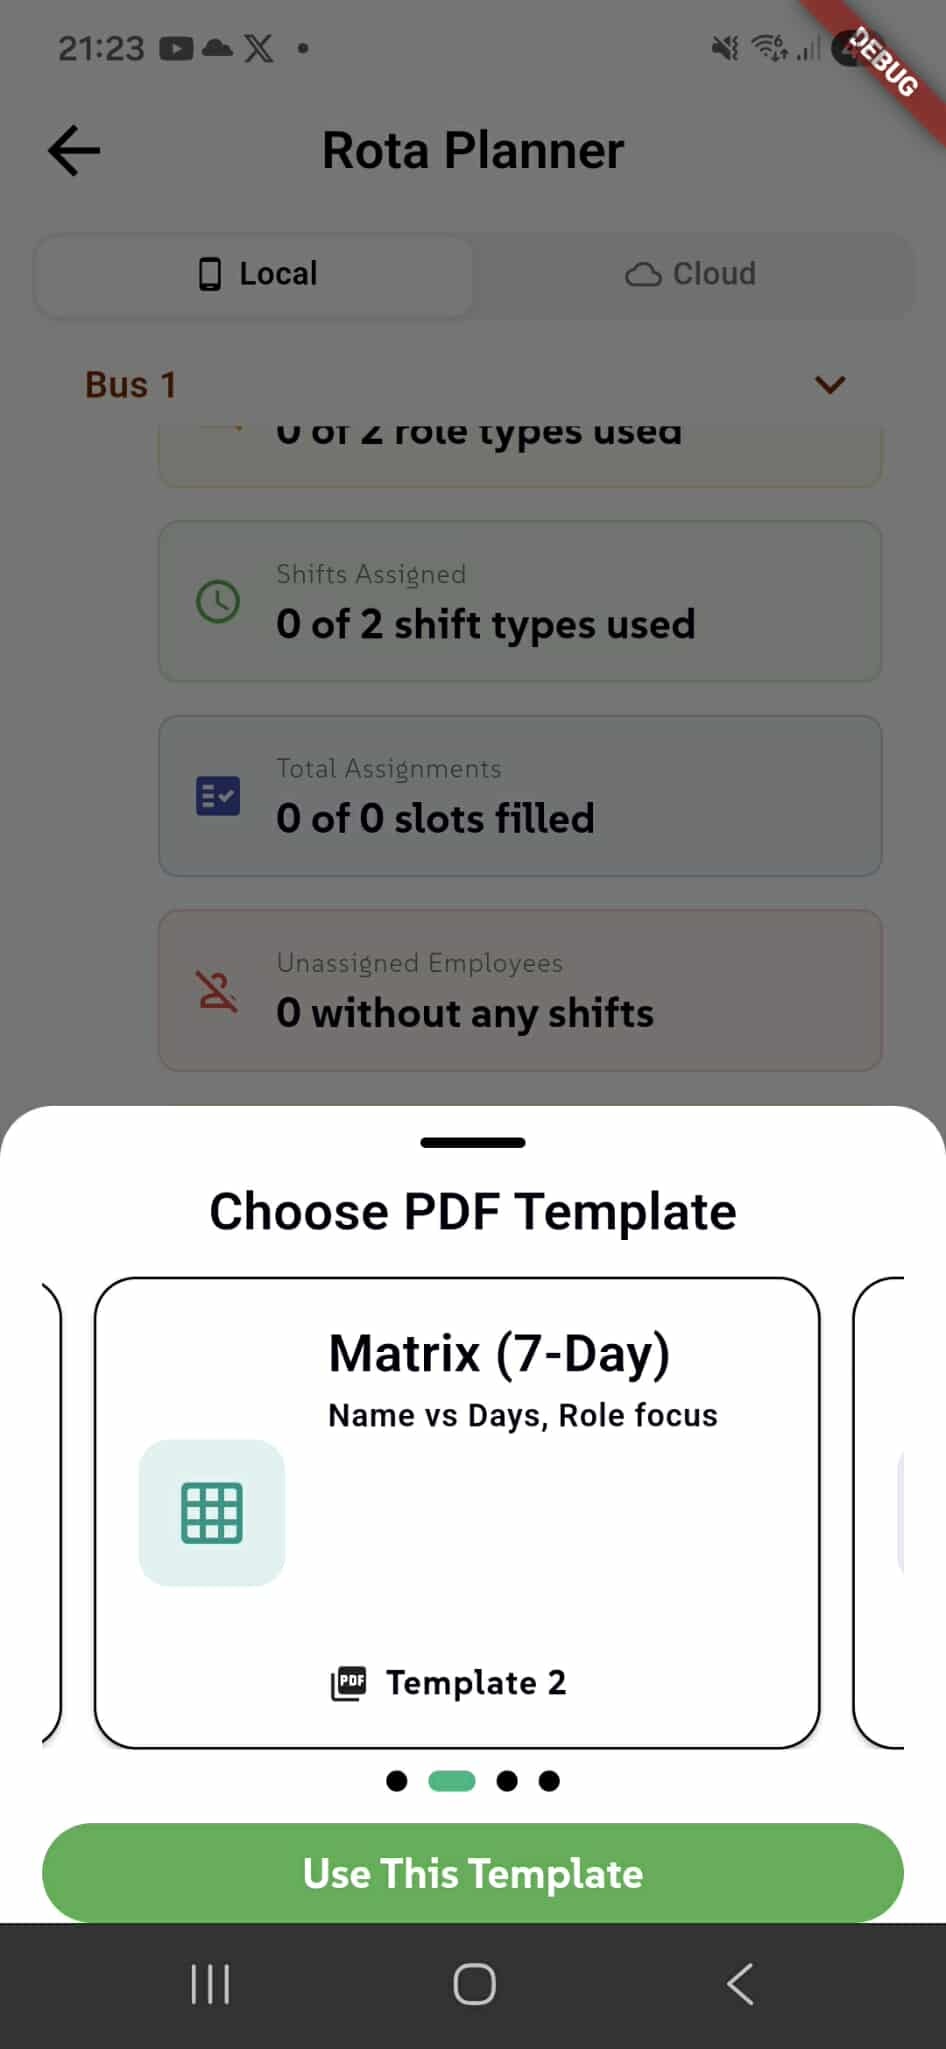
Select PDF Template
After reviewing the rota summary, users can generate their schedule as a PDF document by selecting from multiple professional template designs. The "Choose PDF Template" modal appears, offering a carousel of available layouts.
The modal displays template cards that users can swipe through horizontally, with pagination dots at the bottom indicating the current selection (4 templates total in this example). Each template card shows:
- Template name (e.g., "Matrix (7-Day)")
- Brief description of the layout (e.g., "Name vs Days, Role focus")
- Visual icon representing the template style (grid icon for matrix layout)
- Template number label (e.g., "Template 2")
Template Access Levels:
The first two templates are free and available to all users, providing basic professional layouts for rota schedules. Additional premium templates (Templates 3, 4, etc.) feature enhanced designs with advanced formatting, color schemes, and visual elements - these are exclusively available to users with full paid access to the BusiTools application.
Once a template is selected, the prominent green "Use This Template" button generates the PDF with the chosen design. The completed rota can then be saved to the device, printed, or shared via email and social media, making it easy to distribute schedules to team members.