Check List
The Check List service helps you create custom checklists tailored to your specific business needs. Use checklists for quality control, safety inspections, inventory audits, or any process that requires verification steps.
Overview
The Check List Manager displays all available checklists. Tap Run to execute a checklist. Use Manage to create, edit, or delete checklists. View Logs to see completed checklist records and historical data.
Custom Checklist Items
When creating a checklist, you can add different item types:
Checkbox - For simple yes/no verification steps Text Input - For open-ended responses and notes Number Input - For quantity or measurement entries Question - For single-choice or multiple-choice questions with predefined answers
Completion & History
When you complete a checklist, it's automatically saved to logs with timestamps and responses. Access completed checklists anytime to review verification history and track compliance across your operations.


Managing Checklists
The Manage tab is where you create, edit, and delete checklists for your locations.
Create a New Checklist
Tap the "New Check List" button to create a custom checklist. A form will open where you name your checklist and define the items. Add different question types (checkbox, text input, number input, or multiple-choice questions). Each item represents a step or verification point in your checklist.
Edit & Delete
Click on any existing checklist to edit its name, description, or items. Modify the structure and questions to match your evolving business needs. Delete checklists you no longer use. Tap Manage tab to access these options.
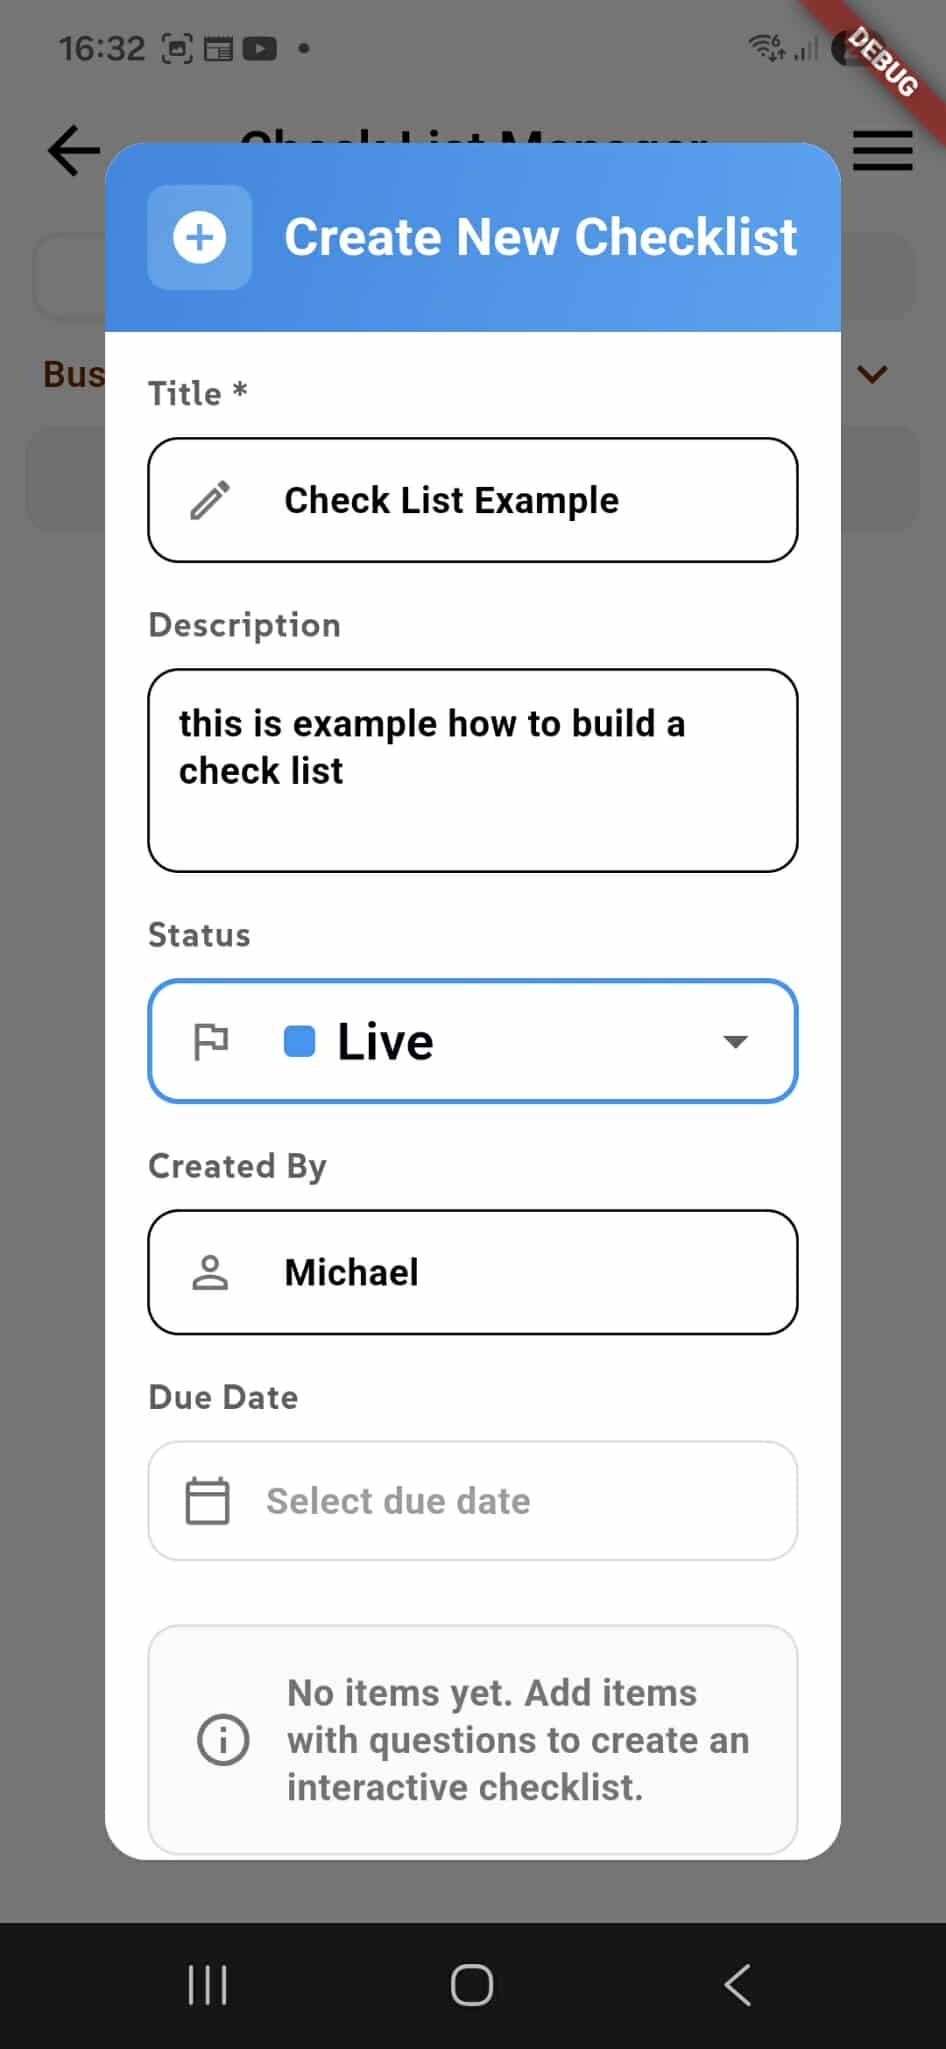
Creating a New Checklist
When you tap "Create New Checklist", a modal appears where you configure the checklist details.
Basic Information
Enter a Title for your checklist (required). This identifies the checklist purpose (e.g., "Daily Safety Inspection," "Inventory Audit"). Optionally add a Description to explain what the checklist is used for and any instructions.
Status & Details
Set the Status to Live to make the checklist active and available for use, or keep it in draft mode. The Created By field shows who created the checklist. Set an optional Due Date if the checklist has a deadline.
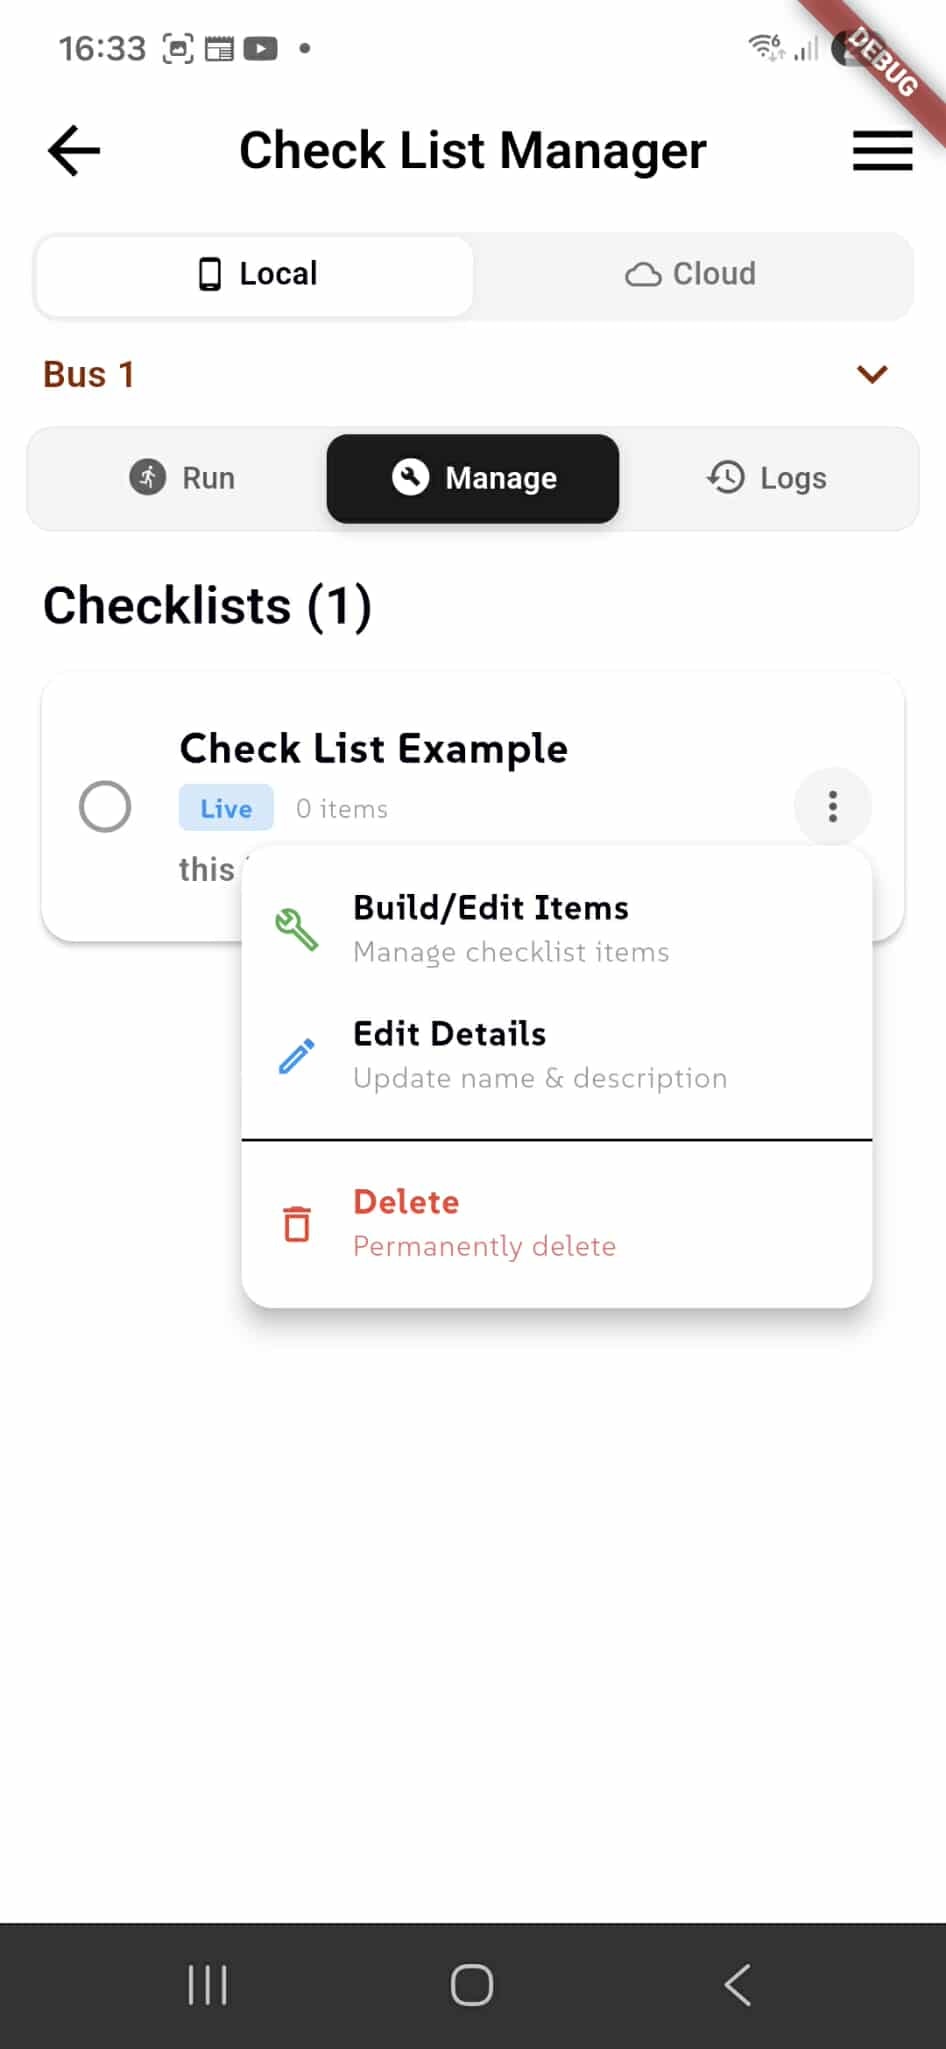
Managing Created Checklists
Once you create checklists, they appear in the Checklists list showing how many checklists exist for the selected location.
Checklist Menu Options
Click the menu icon (three dots) on any checklist to access management options:
Build/Edit Items - Add, modify, or remove questions and checkboxes in your checklist. Customize the items that users will complete when running the checklist.
Edit Details - Update the checklist name, description, status, or due date. Modify the checklist configuration anytime.
Delete - Permanently remove the checklist. This action cannot be undone.
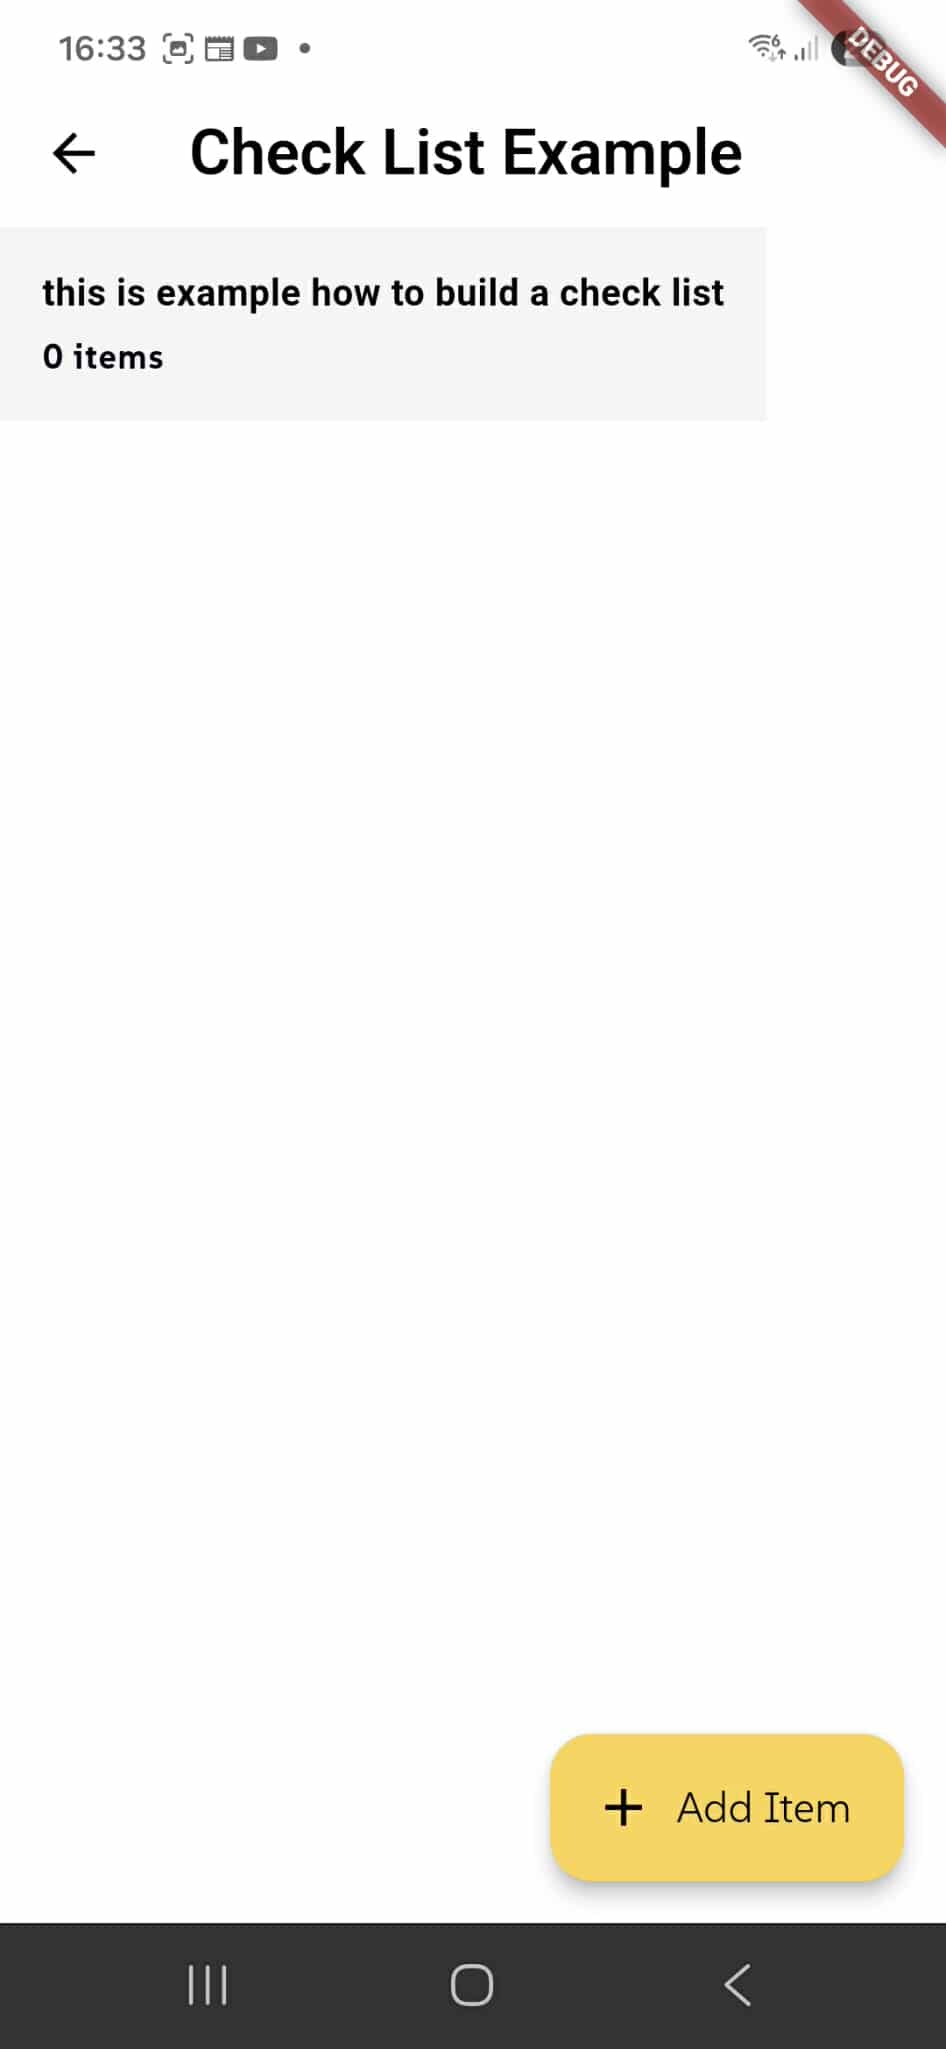
Building Checklist Items
When you click on a checklist, the checklist editor opens showing the checklist name and description. This is where you add questions and items that users will complete when running the checklist.
Add Items
Tap the "Add Item" button to create new checklist items. Each item represents a step, question, or verification point in your checklist.
Item Types
When adding items, choose from different types:
Checkbox - Simple yes/no verification steps Text Input - Open-ended responses and notes Number Input - Quantity or measurement entries Question - Single-choice or multiple-choice questions with predefined answers
Adding Checklist Items
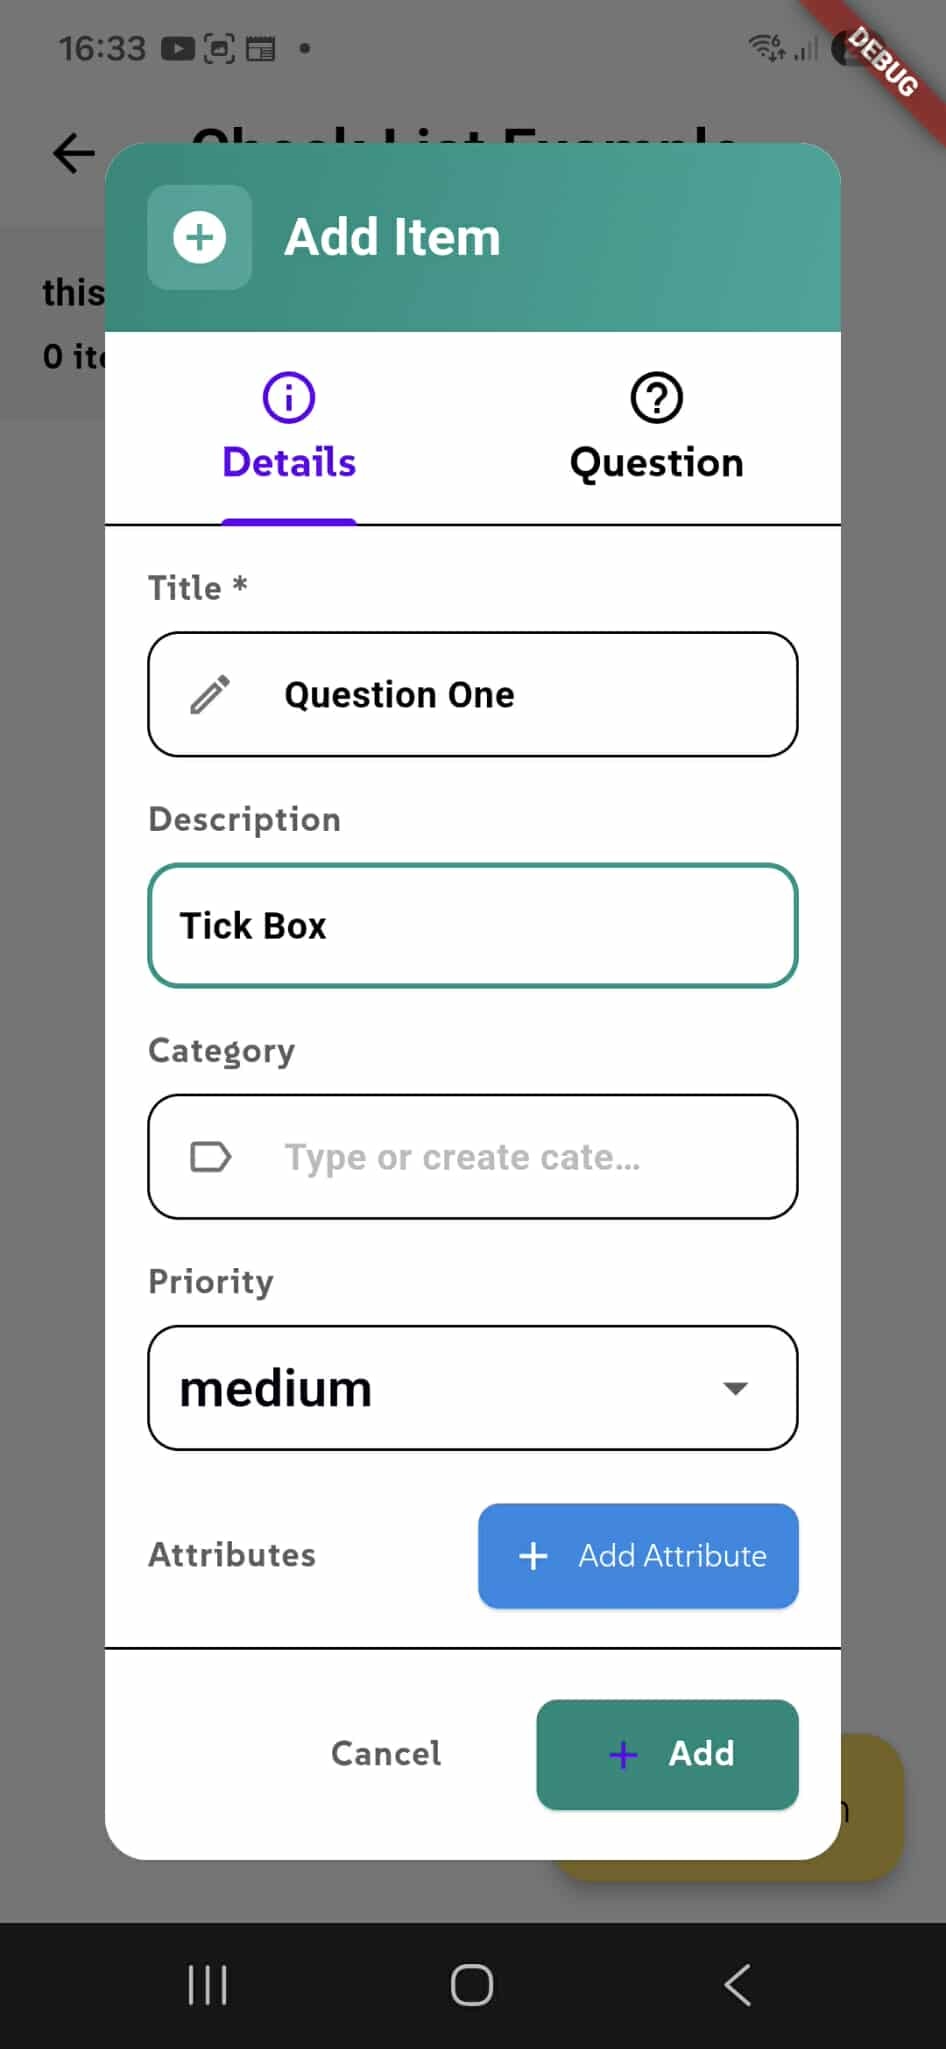
When you tap "Add Item", a modal opens with two tabs: Details and Question. Configure your item using these tabs.
Details Tab
Enter a Title for the item (required) - this is the question or step name (e.g., "Question One"). Add a Description to explain what the item is about (e.g., "Tick Box"). Optionally assign a Category to organize items by type. Set Priority (low, medium, high) to indicate item importance.
Save Item
Click Add to save the item to your checklist, or Cancel to discard it. You can add as many items as needed, each with different response types.
Organizing Items with Categories
Categories in checklists work like steps or sections that group related items together. Each category can contain multiple checklist items, helping organize complex checklists into logical stages (Step 1, Step 2, Step 3, etc.).
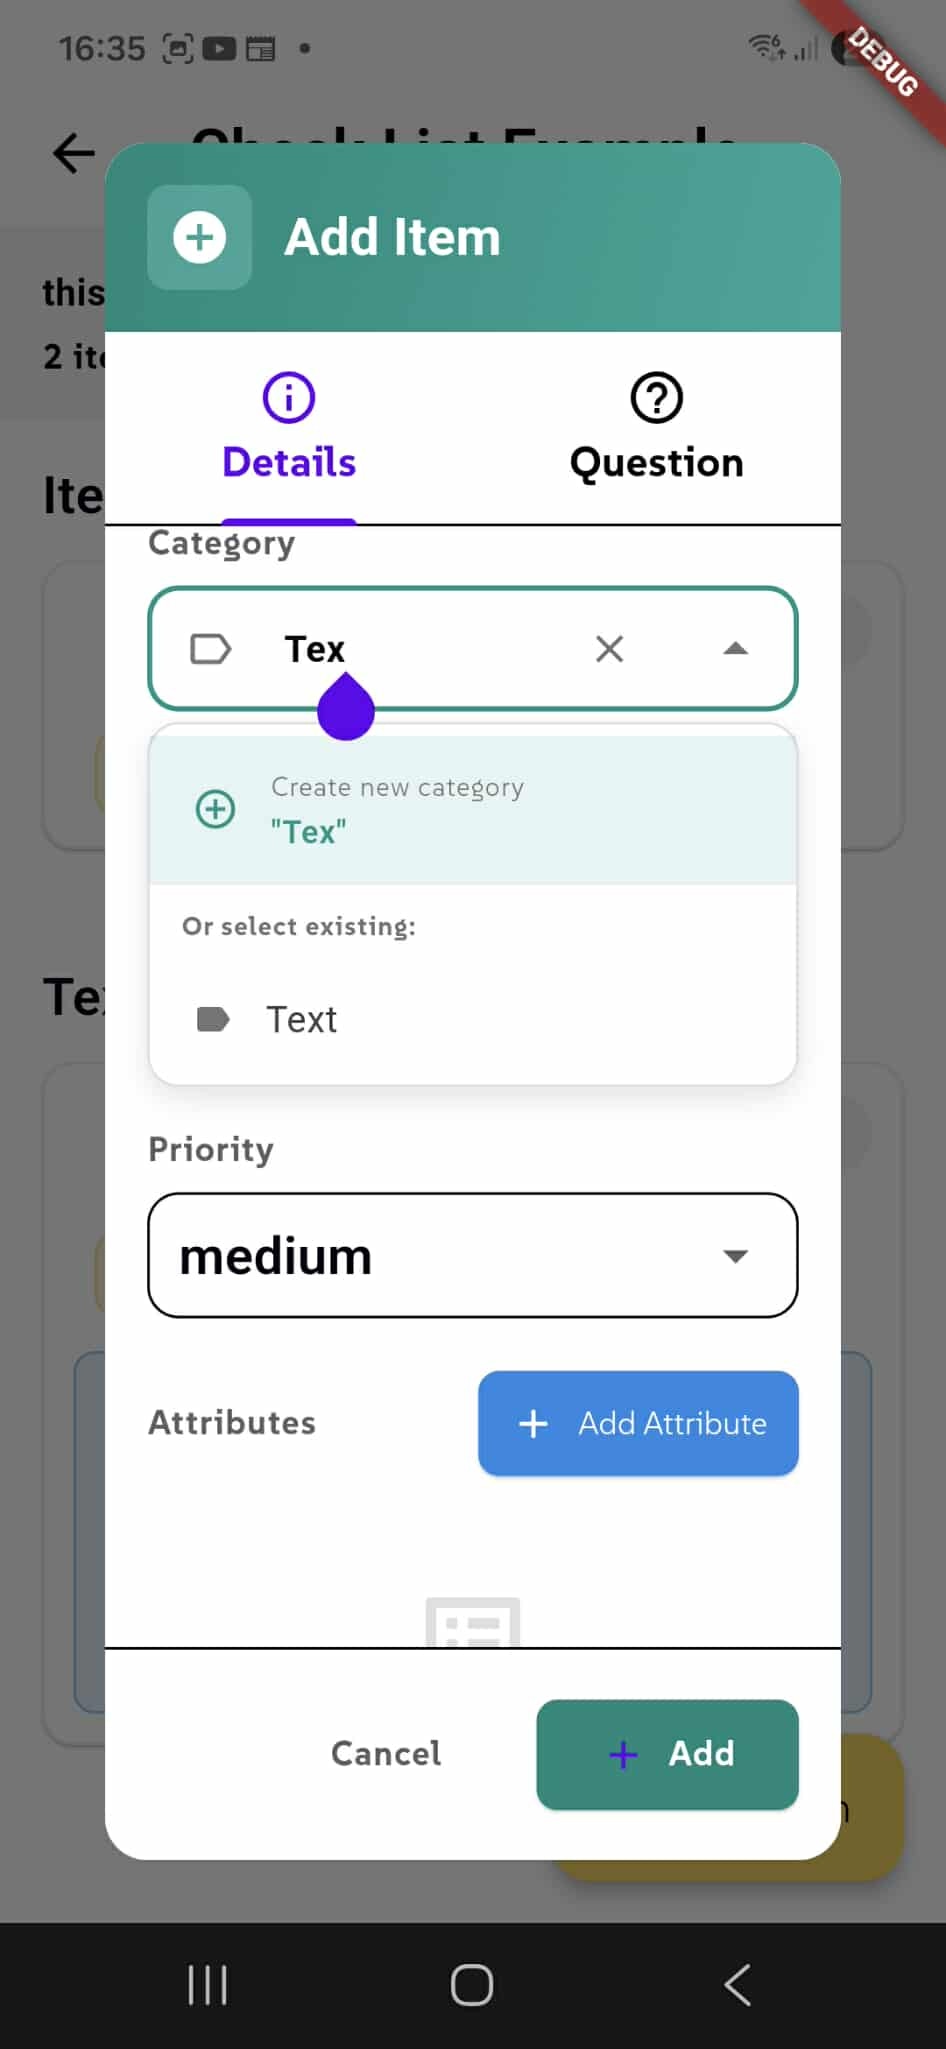
Category Selection
The Category dropdown lets you assign items to existing categories or create new ones. Select from previously created categories, or type a new category name to create it on the fly. If you leave the category empty, the item is automatically assigned to the default category.
Multiple Items Per Category
Add as many items as needed to each category. For example, Step 1 might have 5 items, Step 2 might have 3 items, and so on. This structure makes checklists easier to navigate and understand during execution.
Flexible Organization
You have complete control over how many categories to create and how many items belong to each. Organize your checklist in a way that matches your workflow and makes sense for your team.
Question Tab
The Question tab lets you define the type of question and response options for your checklist item.
Question Type
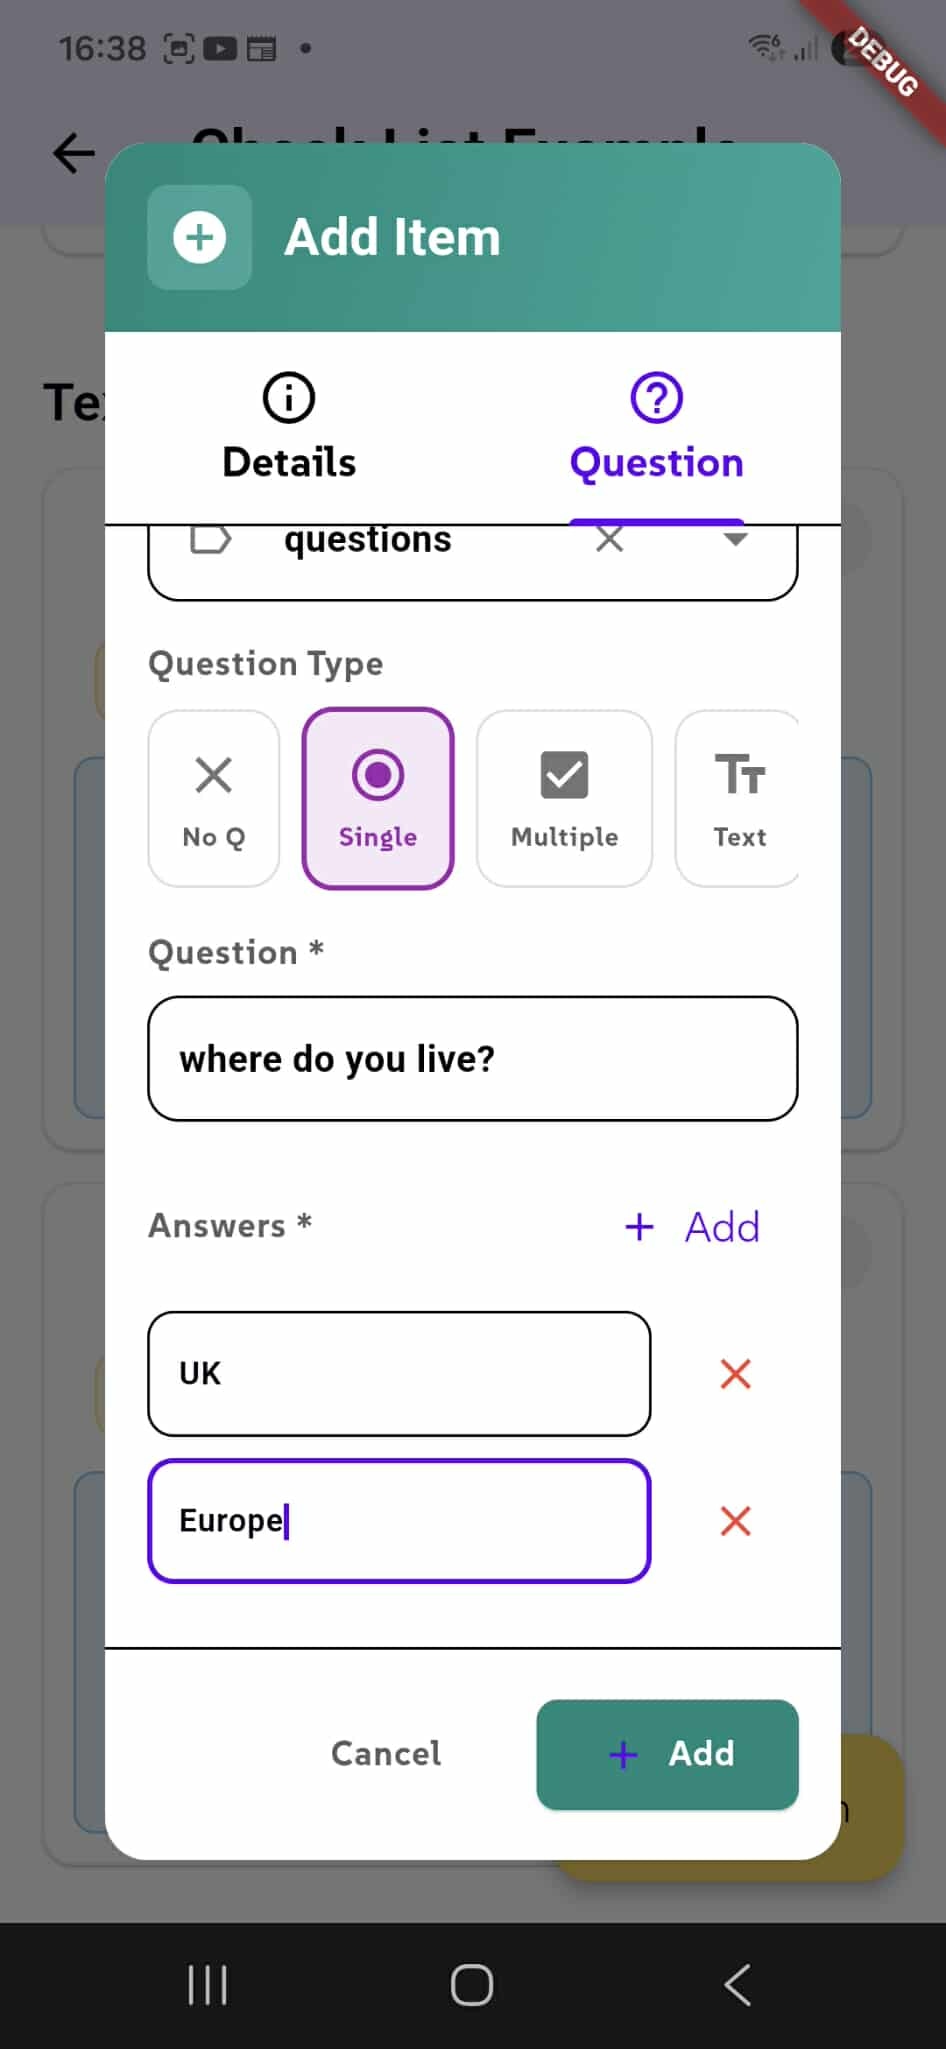
Choose from four question types:
No Q - A simple statement with no response required Single - Users select one answer from multiple options Multiple - Users can select multiple answers Text - Users provide open-ended text responses
Define Your Question
Enter the Question text (required) that users will see when completing the checklist (e.g., "Where do you live?").
Add Answers
For Single and Multiple choice questions, add predefined Answers that users can select from. Click "Add" to add answer options. Each answer is displayed as a selectable option. Remove answers using the X button if needed.
Single vs. Multiple Choice
Select Single for questions where only one answer is correct or applicable. Select Multiple for questions allowing users to choose more than one option (e.g., checklist items with several valid selections).
Adding Multiple Answers
When creating Single or Multiple choice questions, you can add as many answer options as needed.
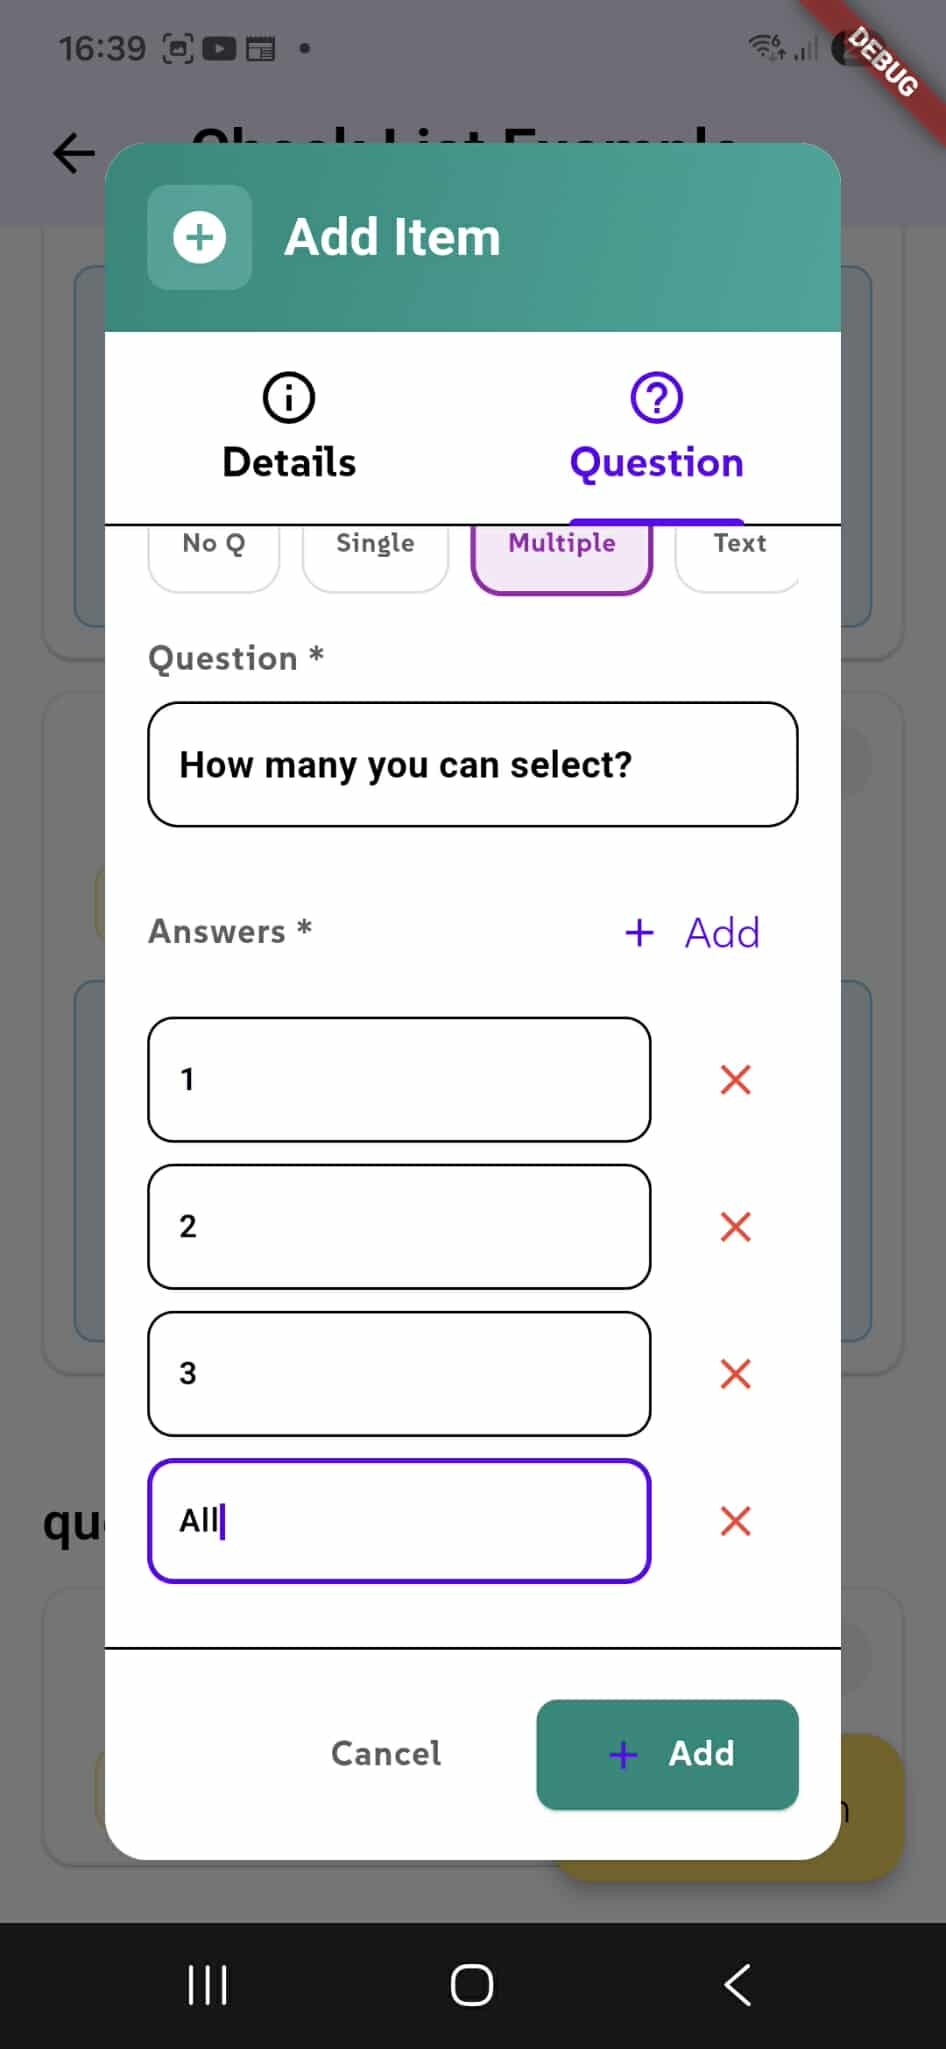
Add Answers
Click the "Add" button to create new answer fields. Each answer appears as a separate option that users can select from when completing the checklist. In this example, the question "How many you can select?" has four answers: "1," "2," "3," and "All."
Remove Answers
Delete unwanted answers by clicking the X button next to each answer. You can add and remove answers anytime during item creation.
Flexible Options
There's no limit to how many answers you can add. For Single choice questions, users pick one answer. For Multiple choice questions, users can select one or more answers. Add as many options as your workflow requires.
Running Checklists
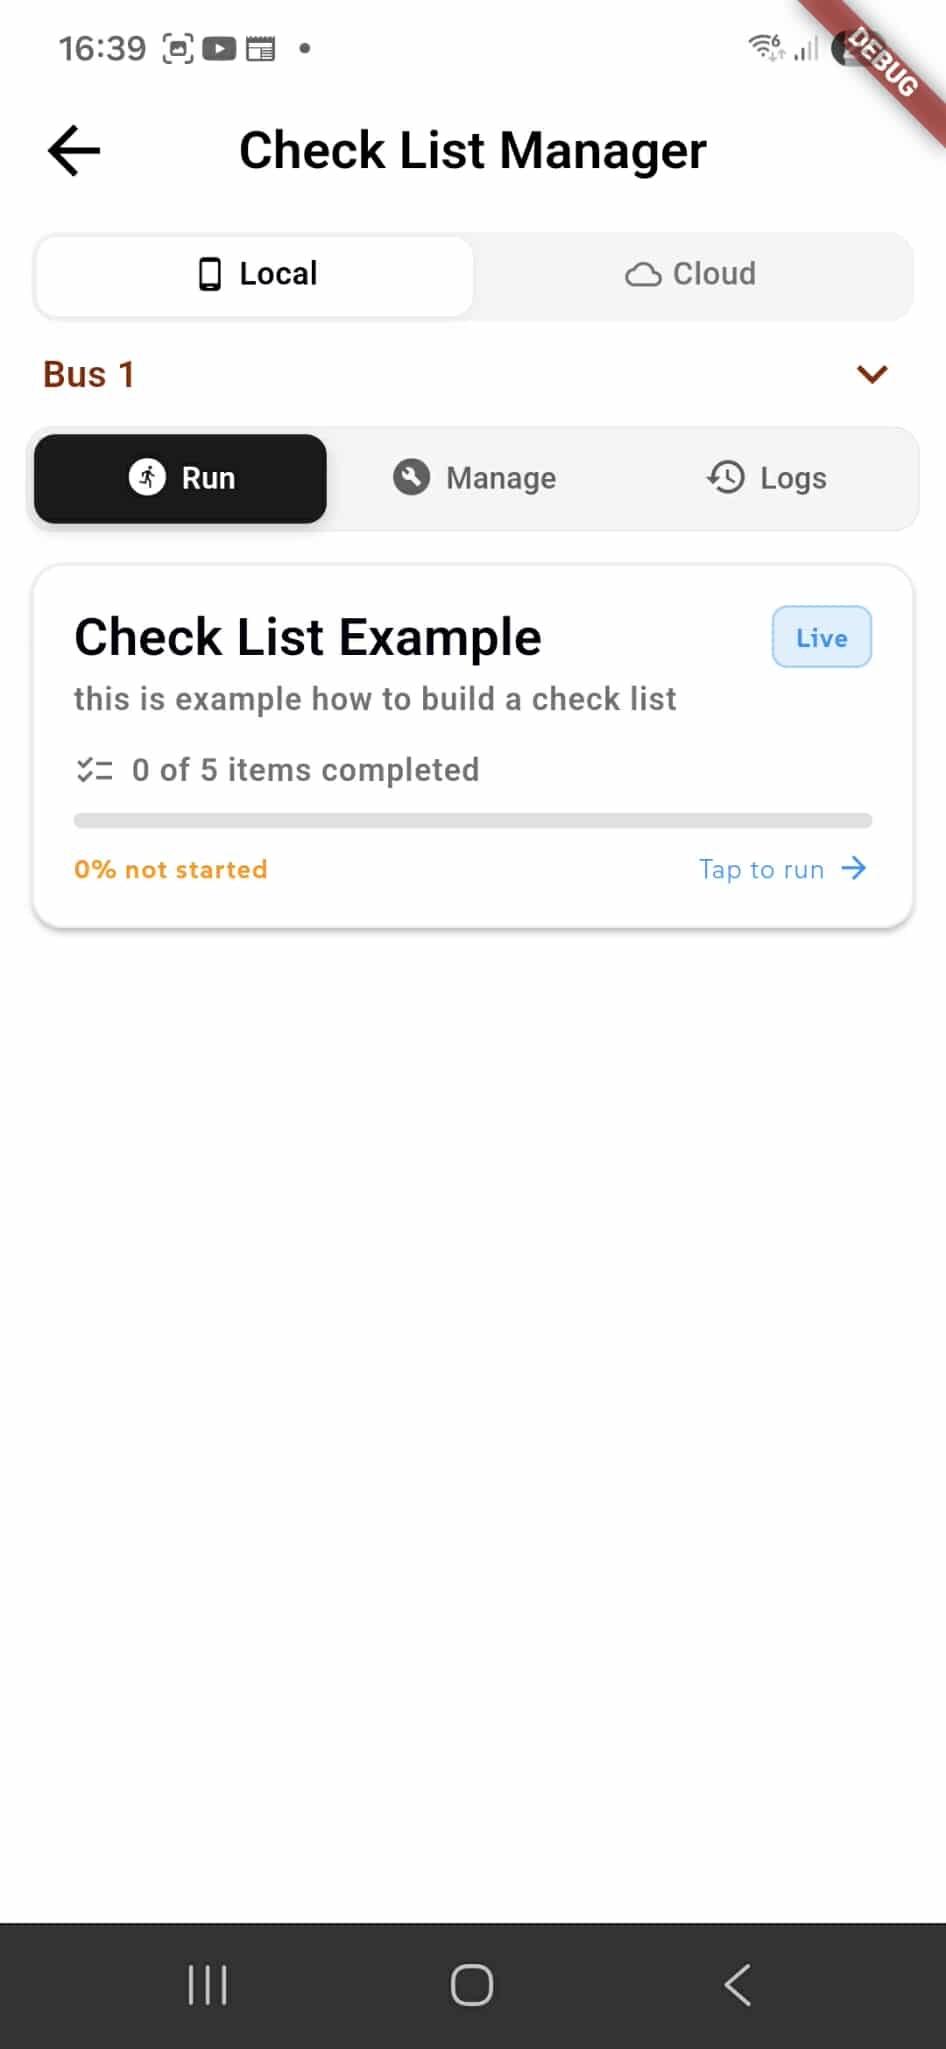
The Run tab displays all live checklists available for execution. Each checklist shows its current progress and status.
Checklist Card
When a checklist is created and set to Live status, it appears in the Run tab. Each checklist card displays:
Status Badge - Shows "Live" indicating the checklist is active and ready to use Description - The checklist purpose and instructions Progress - Shows "0 of 5 items completed" indicating how many items users have finished Completion Status - "0% not started" shows the overall progress percentage
Execute a Checklist
Tap "Tap to run" to start completing the checklist. This launches the interactive checklist where users answer questions, select options, and complete all items. Progress updates in real-time as items are completed.
Track Progress
Monitor checklist completion across your team. View which checklists are in progress, completed, or not yet started. Use the progress indicators to ensure all required checklists are finished.
Executing a Checklist
When you start running a checklist, you complete items step by step through organized categories.
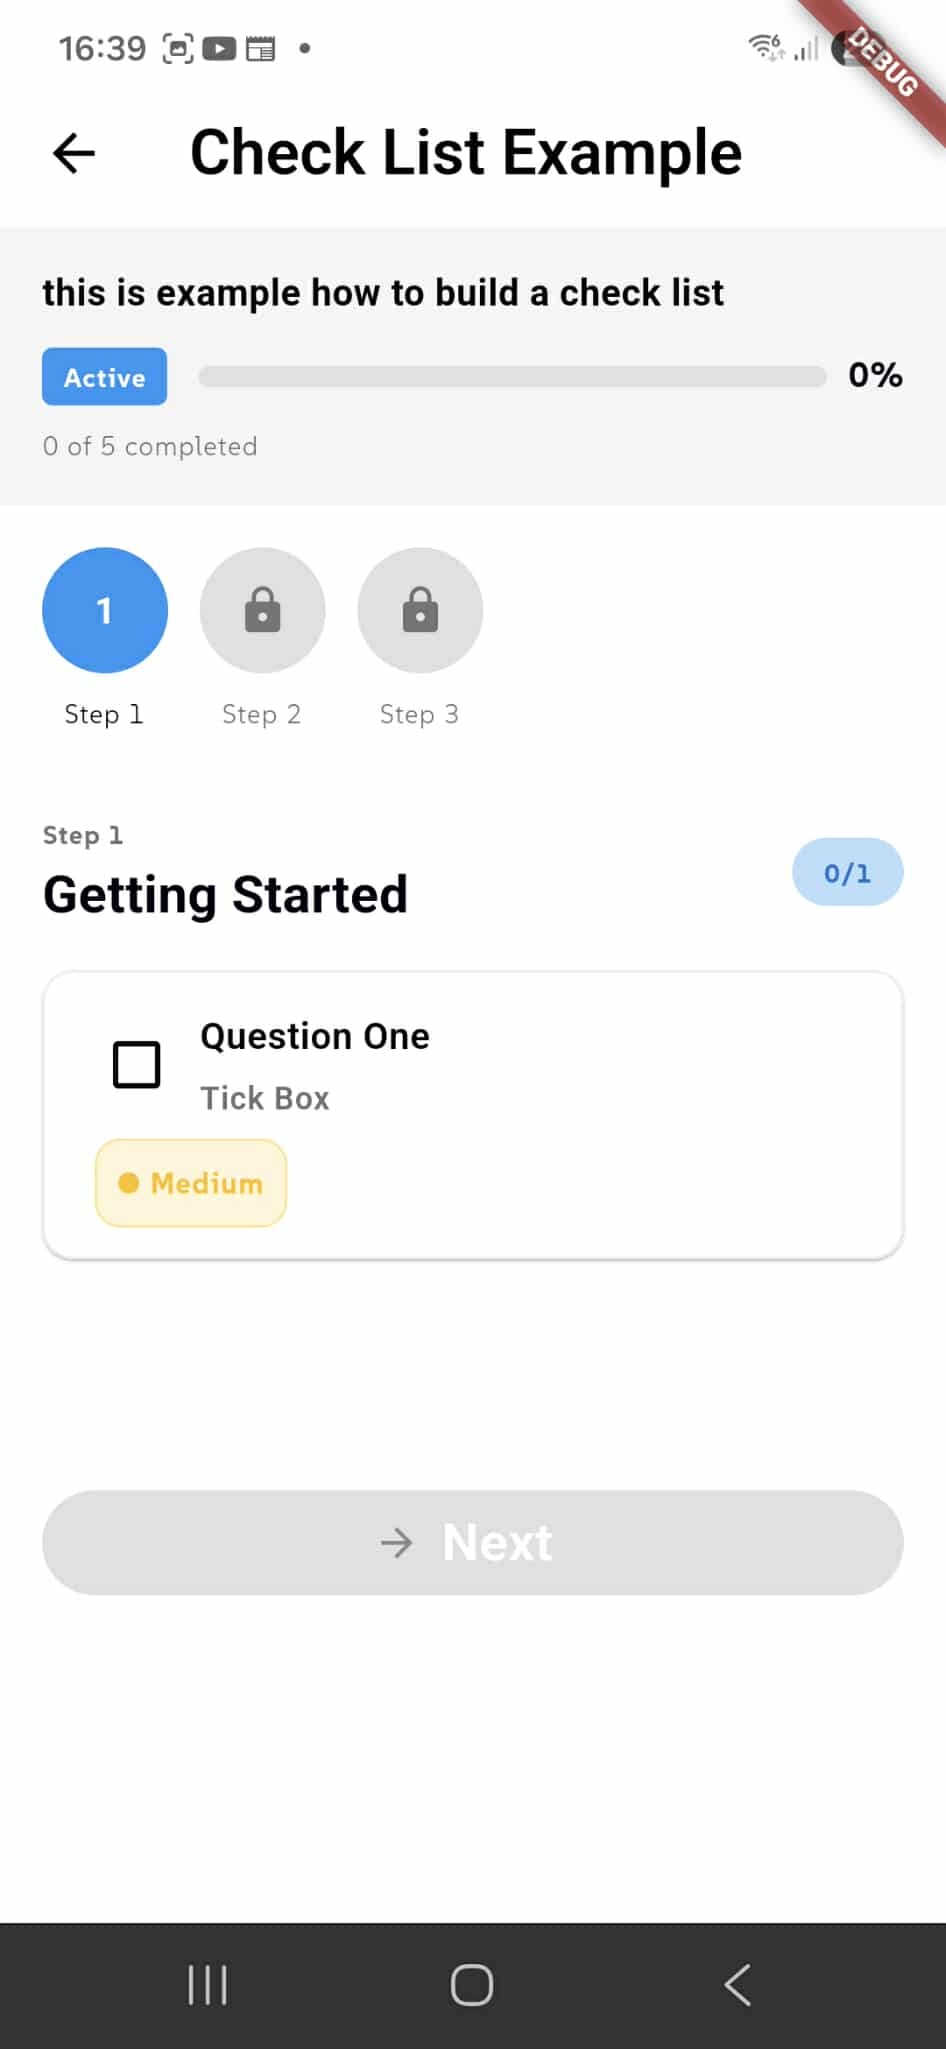
Checklist Overview
At the top, you see the checklist Status ("Active"), Progress percentage (0%), and Item Count ("0 of 5 completed"). Step indicator buttons show your progress through different checklist sections. The current step is highlighted in blue, while locked steps appear greyed out.
Complete Items
Each item displays the question or task with its type. For checkboxes like "Question One - Tick Box," simply click the checkbox to mark it complete. The Priority badge (e.g., "Medium") indicates item importance. As you complete items, the progress counter updates.
Navigate Between Steps
The Next button is disabled (greyed out) until you complete the required items in the current step. Once you check the necessary boxes or fill in required fields, the Next button becomes enabled. Click Next to move to the following category or step. The step indicator buttons at the top update to show your progress through the checklist.
Step Organization
Checklists are organized into logical steps (Step 1, Step 2, Step 3, etc.). Complete all items within a step before advancing. This structured approach ensures thorough completion of each phase.
Answering Multiple Choice Questions
Some checklist items ask questions with multiple answer options that users must complete.
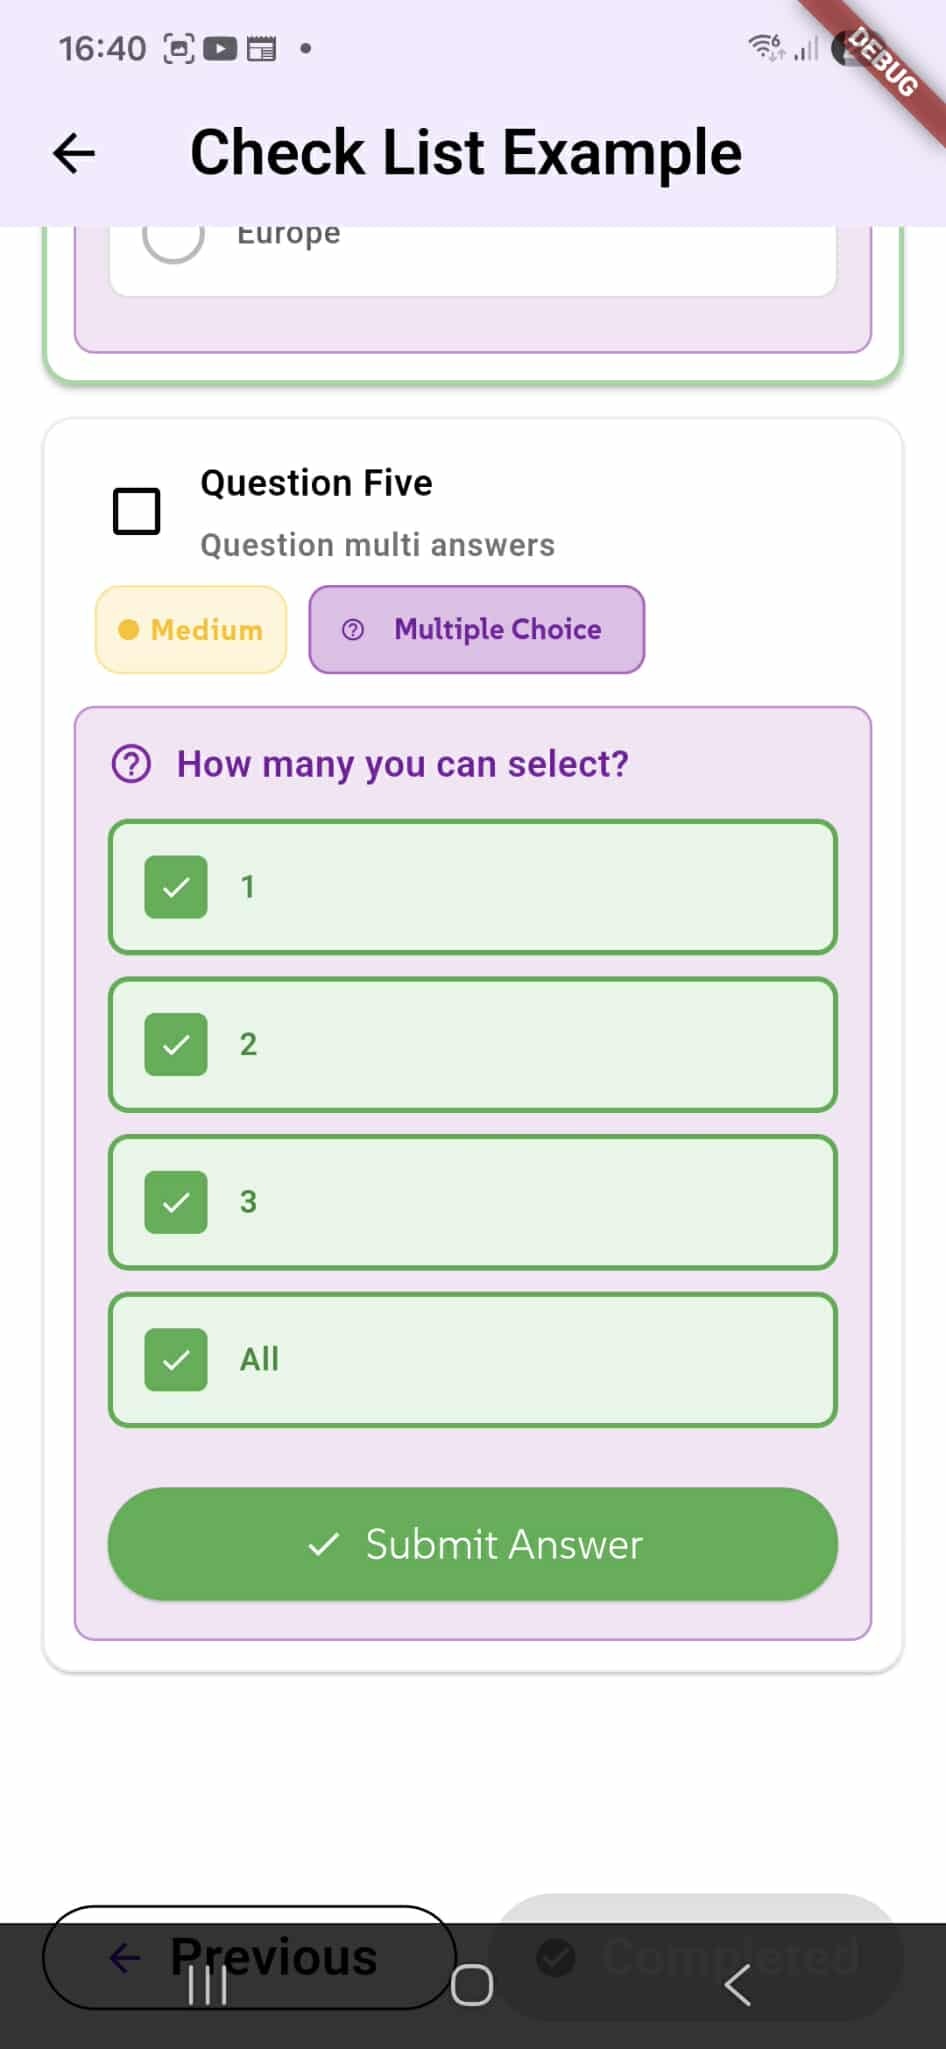
Multiple Choice Item
Question Five shows a Multiple Choice question: "How many you can select?" with multiple answer options (1, 2, 3, All). Users can select one or more answers depending on the question type.
Select Answers
Click on any answer option to select it. Green checkmarks indicate selected answers. For multiple-choice questions, you can select as many options as applicable. Deselect answers by clicking them again.
Submit Your Answer
After selecting your answer(s), click "Submit Answer" to record the response and complete the item. The checklist progresses once the answer is submitted.
Answering Text Input Questions
Some checklist items require open-ended text responses from users.
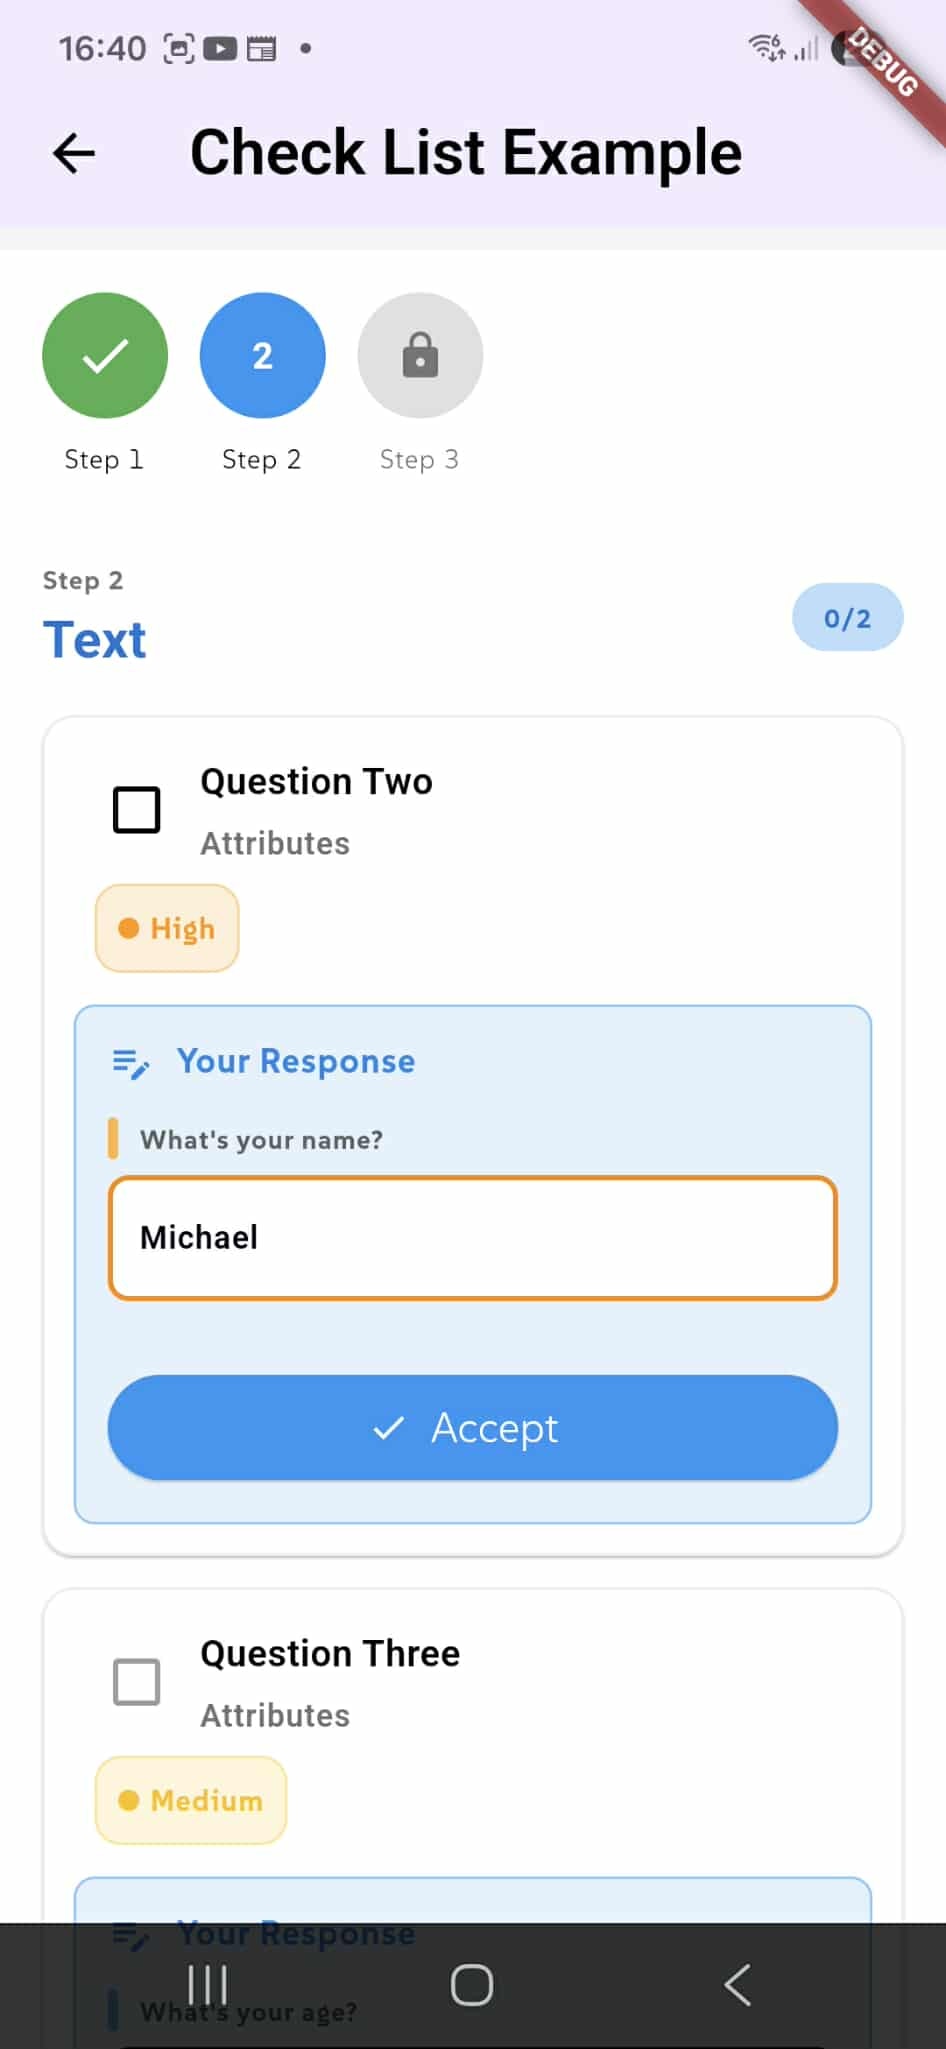
Text Input Item
Question Two shows a text input question with Attributes section. The question asks for user-provided information (e.g., "What's your name?") and displays an input field where users type their response.
Provide Your Response
Under "Your Response", enter the required text in the input field. The example shows "Michael" as a response to "What's your name?" Type any text, numbers, or information the question requests.
Accept Your Answer
After entering your text response, click "Accept" to record and submit the answer. The item is then marked as complete.
Multiple Items Per Step
Steps can contain multiple items of different types. In this example, Step 2 has both Question Two (text input) and Question Three (another item). The progress counter shows "0 / 2" indicating how many items in the step are completed. Complete all items before advancing to the next step.
Priority Badges
Each item displays a Priority badge (High, Medium) indicating its importance or urgency.
Checklist Logs and Export
Once you complete a checklist, the completion record is saved to Logs where you can review responses and generate reports.
View Logs
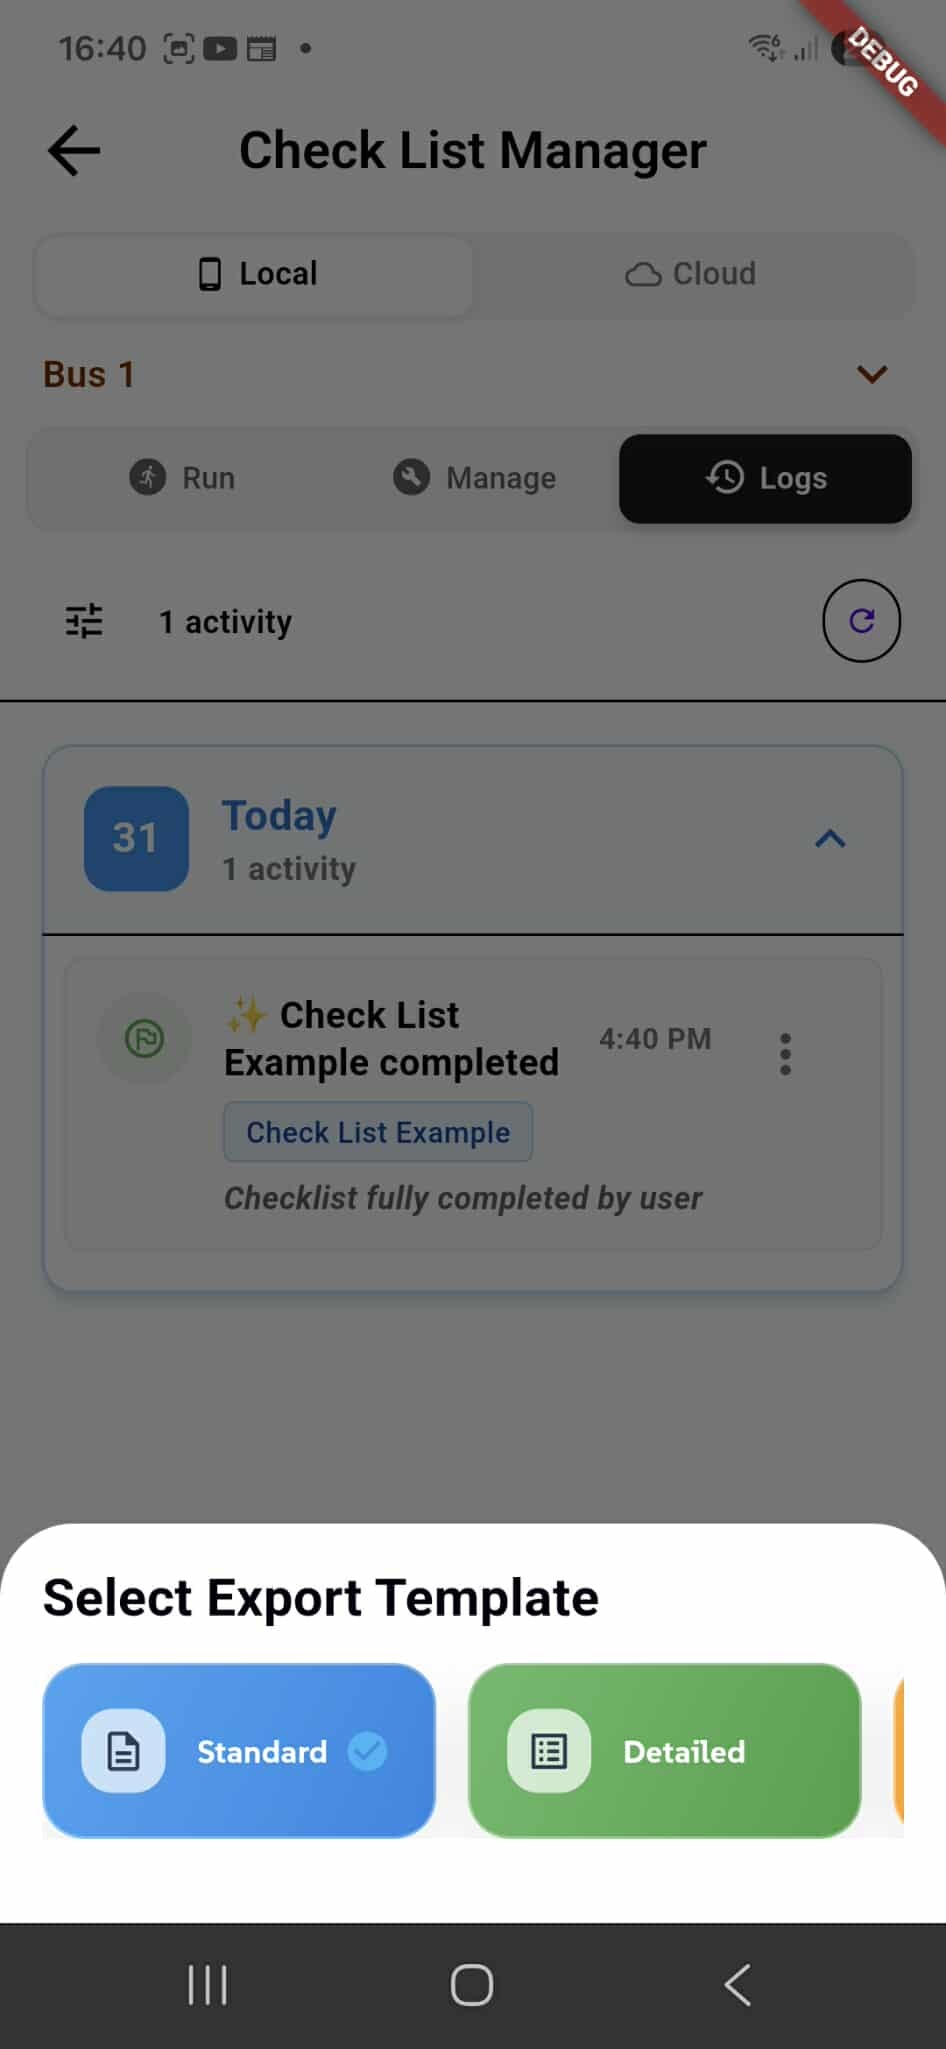
Click the Logs tab to see all completed checklists. Each log entry shows the checklist name, completion date and time, and status. The example shows "Check List Example completed" at 4:49 PM with a note "Checklist fully completed by user."
Export to PDF
When viewing a completed checklist, you can generate a PDF file showing all checklist answers and responses. A modal appears asking you to select the PDF template style:
Standard - A clean, professional PDF format with all answers and responses Detailed - A comprehensive PDF report with metadata, timestamps, and detailed breakdowns
Save, Print, or Share the PDF
Once the PDF is generated, you can:
Save - Download and store the PDF file on your device for record-keeping Print - Print the PDF directly from your device to paper Share - Send the PDF via email or other sharing methods to team members, clients, or stakeholders
Each completed checklist creates an audit trail with a downloadable PDF document.
Viewing Completed Checklist Responses
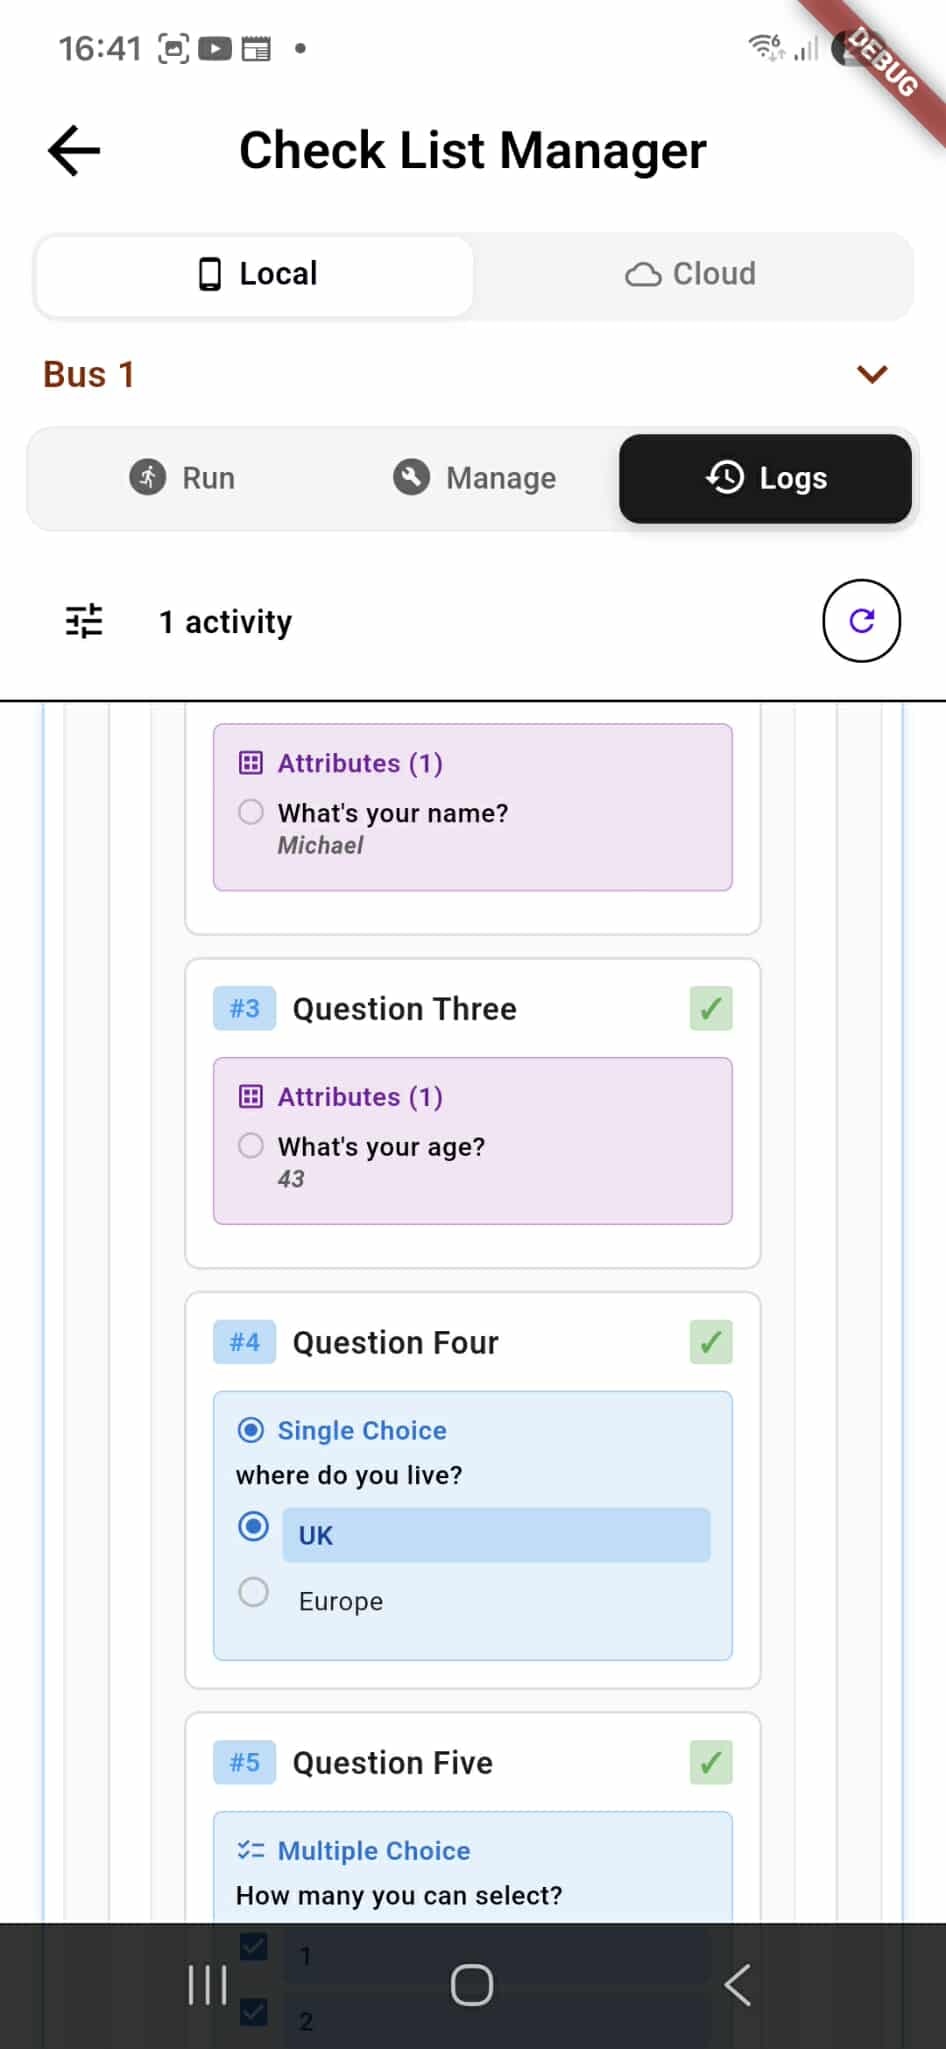
In the Logs tab, you can expand and review all responses from completed checklists.
Expand Log Entry
Click on any checklist log entry to expand it and see all responses. The log displays each question and its corresponding answer in an organized format.
Response Details
Each item shows:
Question Number & Name - Identifies the checklist item (e.g., "Question Three") Completion Status - A checkmark indicates the item was completed Question Type - Shows the type of question (Text Input, Single Choice, Multiple Choice, etc.) User Response - Displays the actual answer provided:
- For text inputs: The text entered (e.g., "Michael", "43")
- For single choice: The selected option (e.g., "UK")
- For multiple choice: All selected options (e.g., "1, 2, 3") Attributes - Shows custom fields and their values
Review All Responses
Scroll through the expanded log to review every response submitted during the checklist execution. This provides a complete record of what was entered and selected.